Blog
April 4, 2024
How to Install (and Configure) Ansible to Deploy a PHP Application

DevOps,
PHP Development
Scaling your deployed PHP applications to meet demand can be complex, and requires careful configuration management to do it effectively. Luckily there are a number of configuration management tools and platforms up for the job.
In this blog, we’ll provide some concrete reasons why an organization should utilize configuration management technologies, and give an applied example of how to deploy a PHP application using Ansible — including some Ansible playbook examples.
Back to topBenefits of Configuration Management for PHP Apps
Many DevOps strategies in place at enterprises deploying and developing PHP applications include management of virtual machines. It is the LAMP stack, after all, and Linux, MySQL or PostgreSQL, and Apache or nginx all contribute to the complete picture of any PHP application. When considering the benefits of adding or enhancing existing investments into a platform or tool like Puppet or Ansible, the benefits of managing and deploying updates to the entire host must be considered. After all, why would one want to completely re-write, re-train, and re-test all of an existing deployment strategies bash scripts to a completely new technology? We contend that the benefits outweigh the work and risk.
Configuration management tools or platforms like Puppet or Ansible can provision a virtual machine from scratch, performing configuration management tasks. It can configure virtual hosts in Apache, change values in php.ini, and perform application deployments, automating git pulls and changing branches for PHP applications deployed in an enterprise environment.
While there are a number of benefits of configuration management tools we could cover as they apply to managing PHP apps, the biggest ones are:
- No Unintended Side Effects
- Availability of Open Source, Agentless, and Automatable Options
- Ability to Create Identical Dev, UAT, and Production Environments
Since we're using Ansible for this specific article, we'll approach these benefits from an Ansible-centric viewpoint. Other platforms, like Puppet, do offer these same general benefits.
Benefit #1: No Unintended Side Effects
An Ansible playbook does not consider the state of an existing host. This means that if I have an Ansible playbook that, for example, updates PHP, I can count on it to work on a fresh install of a VM, or a VM that was a year old with many active operators working on it. That playbook might be responsible for doing tasks such as downloading package manager via yum or dnf, installing the latest version of PHP, and restarting PHP-FPM. Ansible playbooks make it easy and in some cases automatic to build in logic that doesn’t rely on state.
Let’s say that PHP wasn’t installed at all, on a fresh machine. Ansible would install the latest version of PHP, not error out because PHP was missing. If there wasn’t a PHP update, the playbook could be written to skip the restart of PHP-FPM, which is excellent for automation: it’s safer. This kind of logic only takes a few lines of configuration in the playbook, reducing boilerplate bash code that your organization is responsible for maintaining.
Benefit #2: Open Source, Agentless, And Automatable
Ansible has a healthy contributor of contributors, and is a free and open source product released under the Apache 2.0 license, the same license that powers the Apache webserver in the LAMP stack. The thousands of collections of in Ansible Galaxy present a ready to use solution for configuring all kinds of third party tools, from nginx to Apache Cassandra.
All of the above combined with the idea that “using” Ansible boils down to Python connecting to your inventory of hosts from a single process over SSH and reporting its work to STDOUT means that you can start using Ansible in place of bash scripts right now, without installing any special software across all of your environments. Install it once on your development laptop and start creating; and once your done? Have your Jenkins CI/CD server run the playbook for you automatically.
Benefit #3: Creates Identical Dev, UAT, and Production Environments
That part about Jenkins running the playbook? It becomes one of the best reasons to really embrace Ansible. If a developer creates a new feature, and it needs to be tested in a lower Dev environment, your CI/CD system can use Ansible to automatically take the artifacts produced by the build process and publish them to Dev automatically.
That same Ansible playbook can take an argument and an inventory to push those same successful Dev artifacts to UAT. This means your Dev, UAT, and Prod environments can be identical, which is the DevOps ideal!
On-Demand Webinar
Simplify Your Zend Server to ZendPHP Migration With the New ZendPHP Ansible Playbook
Join our expert for an on-demand discussion surrounding the new ZendPHP Ansible Playbook, and learn how it can simplify your migration from Zend Server to ZendPHP.
Comparing Configuration Management Technologies for PHP Apps
The problem of configuration management has been solved with bubblegum-and-baling-wire scripts since the early internet. This of course means there have been many ways that the open source community has worked to solve the problem of Configuration Management, the problem Ansible works to solve. Let’s take a look at other options that may already be in place in your organization, or up for your consideration.
Puppet
Puppet is an open source configuration management platform that involves building manifests with the Puppet language.The main way Puppet manifests differ from Ansible is that Puppet’s manifest internals are written in the Ruby-based PuppetDSL (Domain Specific Language), whereas Ansible is based in Python. Puppet is also a pull-based model, with agents installed on each host in the inventory polling a central controller for updates. This has benefits, like increased resilience during network outages, but at the expense of having one’s Puppet controller become critical infrastructure that must be kept online and maintained.
Chef
Chef is another open source, pull-based, agent-driven configuration management technology. Unlike Puppet, though, Chef’s “cookbooks” don’t just utilize Ruby internally, but are a full-blown Ruby Domain Specific Language (DSL). If your team is already writing code in Ruby, Chef might be a great choice for DevOps.
Back to topAnsible Installation Guide for PHP Apps
Let’s take a look at how we could deploy a Laminas / Mezzio PHP application on a Linux VM with Ansible.
Required Materials
To follow along with this example, you should have an IDE that supports Ansible syntax highlighting (Visual Studio Code, IntelliJ IDEA, etc.), the ability to run Python, and SSH access to the host you want to configure.
- Ansible Cannot Be Installed on Windows, only WSL
- Installing Ansible on Enterprise Linux
- Installing Ansible on Mac
Let's get started.
Back to topConfiguration Steps
With installation out of the way, it's time to start configuration -- which applies the configuration you’re going to create in your playbook across an “inventory” of individual hosts. Creating one is really simple, but scales with your organization to include features like dynamic inventory (for example, an API that asks AWS which machines have the “webservers” tag).
Step #1: Create a host inventory
For this configuration, i started with just one host in my inventory, a “free-tier” Ubuntu 22 server I spun up on AWS.
Here’s what the inventory file looks like:
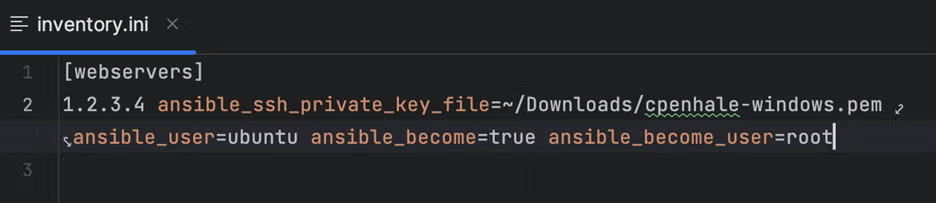
There’s a ton of documentation on the Ansible inventory process here, but the important bits are on line 2. I’ll break out each directive I used:
- 1.2.3.4 – the IP address or DNS hostname of our host
- ansible_ssh_private_key_file – the SSH credential supplied by AWS, which is how ansible will log into the host without a password
- ansible_user – this is the SSH username that goes with the key
- ansible_become – this directive tells ansible to use “sudo” immediately and switch to another user
- ansible_become_user – the user we’re sudoing to, root
Step #2: Create the playbook directory structure
The directory structure of an Ansible playbook looks like this:
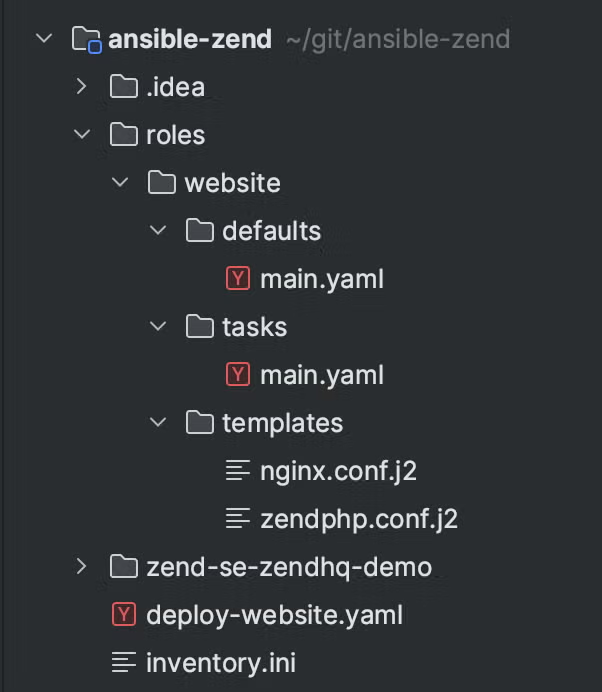
Notice out “inventory.ini” file sitting at the root of the project directory. Next to it is where we’re going to write our playbook, “deploy-website.yaml.” For this example, we’re going to create a role called “website” in the “roles” folder with three directories that comprise the role:
- defaults – contains values that ansible will default to variables aren’t overridden at runtime
- tasks – the ansible tasks that get called by the role
- templates – jinja templates that will get rendered by the tasks
Step #3: Write the playbook
The Ansible playbook is a yaml file that informs ansible of the roles that should be applied to specific hosts. Let’s take a look at ours:
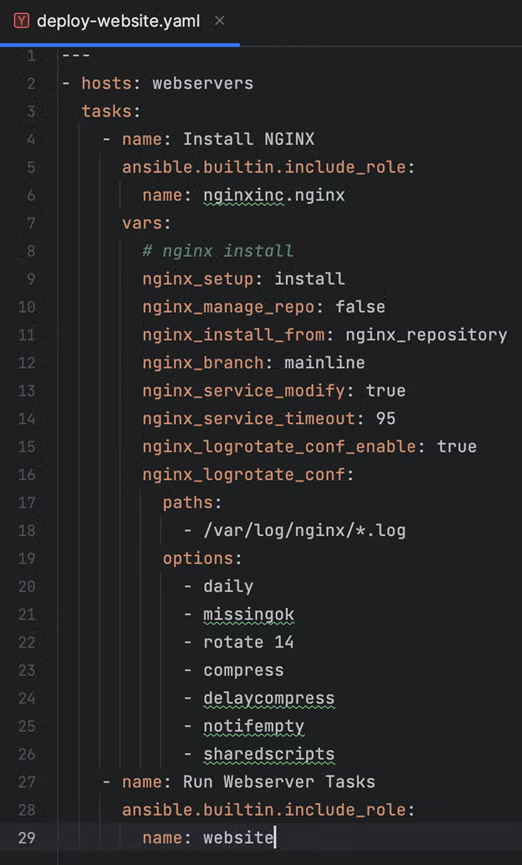
Line 2 is related to line 1 in the inventory file: all hosts that are “webservers” in the inventory.ini file will execute these tasks.
Line 3 is a list of two tasks: “install NGINX” and “Run Webserver Tasks.” “Install NGINX” is a community-supported role that is available on Ansible Galaxy. To use this role which isn’t loaded with Ansible by default, we’ll run Ansible Galaxy to load it:
ansible-galaxy role install nginxinc.nginx Long story short with this role is that we’re installing NGINX with some customizations!
Starting on line 27 is where our new role, “Run Webserver Tasks” will live. Line 28 instructs ansible to run the role “website” on line 29
Step #4: Write your first role!
I’ve included a complete role for you to start with as an example! Let’s check it out, section by section (you can visit our companion GitHub Gist to reference it with line numbers and proper YAML formatting).
---
            - name: configure zendphp repo credentials
              template:
                src: templates/zendphp.conf.j2
                dest: /etc/apt/auth.conf.d/zendphp.conf
                owner: root
                group: root
                mode: '0644'

            - name: Configure zend repo
              block:
                - name: zend |no apt key
                  ansible.builtin.get_url:
                    url: https://repos.zend.com/zend.key
                    dest: /etc/apt/keyrings/zend.asc

                - name: zend |apt source
                  ansible.builtin.apt_repository:
                    repo: "deb [signed-by=/etc/apt/keyrings/zend.asc] https://repos.zend.com/zendphp/deb_{{ ansible_distribution | lower }}{{ ansible_distribution_version | regex_replace('\\.', '') }}/ zendphp non-free"
                    state: present
                    update_cache: true

            - name: Install  zendphp
              ansible.builtin.apt:
                pkg:
                  - "php{{ php_version }}-zend"
                  - "php{{ php_version }}-zend-fpm"
                  - "php{{ php_version }}-zend-dev"
                  - "php{{ php_version }}-zend-xml"
              register: zend_install

            - name: Install extensions for project
              ansible.builtin.apt:
                pkg:
                  - "php{{ php_version }}-zend-{{ item }}"
                state: present
              with_items: "{{ extensions }}"

            - name: configure nginx for php-fpm
              template:
                src: templates/nginx.conf.j2
                dest: /etc/nginx/sites-available/default
                owner: root
                group: root
                mode: '0644'

            - name: upload website
              ansible.builtin.copy:
                src: zend-se-zendhq-demo/worker/
                dest: /var/www/worker/
                owner: www-data
                group: www-data

            - name: start php fpm if not started
              ansible.builtin.service:
                name: "php{{ php_version }}-zend-fpm"
                state: started

            - name: start nginx  if not started
              ansible.builtin.service:
                name: nginx
                state: started

            - name: restart php fpm if zend install has changed
              ansible.builtin.service:
                name: "php{{ php_version }}-zend-fpm"
                state: restarted
              when: zend_install is changed
              register: fpm_restart

            - name: restart nginx if fpm has been restarted
              ansible.builtin.service:
                name: nginx
                state: restarted
              when: fpm_restart is changed
In Ansible, each item in a role is named. For example, on line 2, after the “---“ on line 1, we see the - character, and the yaml key “name.” Each named task is referred to by this name, so for example, the sixth task in this list is “upload website.” I’ll list the tasks I’ve shown below, and explain what each of them do, though each named task does explain its objective!
- configure zendphp repo credentials
- Here I’m rendering a template “zendphp.conf” to /etc/apt/auth.conf.d and updating it with a username and password to use Zend’s customer repository
- The template looks like this:
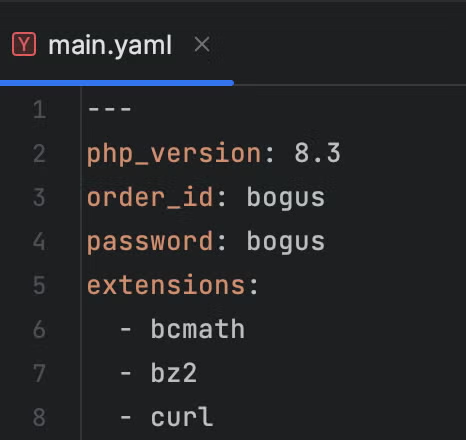
- The variables come from the “defaults” folder I mentioned before. main.yaml in defaults looks like this:
- Configure zend repo
- Here we’re using ansible’s built in apt repository support. First we download Zend’s public key (ansible.builtin.get_url) and then we create the Zend apt repository (ansible.builtin.apt_repository)
- Notice that we’ve automated the retrieval of the right versions with a template on line 19:
- deb_{{ ansible_distribution | lower }}{{ ansible_distribution_version | regex_replace('\\.', '') }}/ zendphp non-free
- will render as
- deb_ubuntu2204/ zendphp non-free
- Install zendphp
- Here we’re using ansbile’s built in apt package management features with “ansible.builtin.apt”
- We’re asking it to install a list of packages, and replacing the template variable “{{ php_version }}” with “8.2” which is defined on line 2 of main.yaml in the “defaults” directory.
- Install extensions for project
- We’re doing the same here, but for a list of extensions. I’ve separated this out to show both ways of doing this. In this case, we’re looping over the list on line 5 of the default values from above with the “with_item” directive. We also template the value on line 35 of the playbook, which will render something like “php8.3-zend-bcmath”.
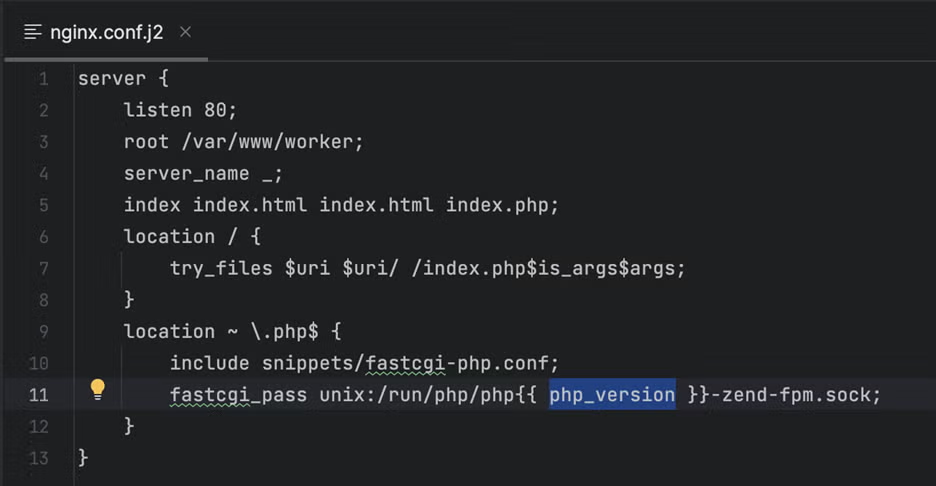
- configure nginx for php-fpm
- Here I’m outputting an nginx configuration that works with my setup! The only variable in this template is on line 11, which gives nginx the correct php fastcgi socket to connect to.
- Upload Website
- here we upload the php files from our app into a location on the web server
- start php fpm if not already started
- here we ensure that the php-fpm service is started. If it’s already started, nothing happens; this will be skipped unless it’s stopped.
- start nginx if not started
- same here with nginx
- restart php fpm if zend install has changed
- however, if php-fpm is started, and as it says on line 69, “zend_install is changed,” php-fpm will be restarted regardless of its current status
- Line 69’s value refers to the “register” directive on line 30. In otherwords, if the task “Install zendphp” is changed (yellow text), then and only then will this task run!
- This is useful for when we do software updates automatically!

Step #5: Run It!
Running the playbook is super easy:
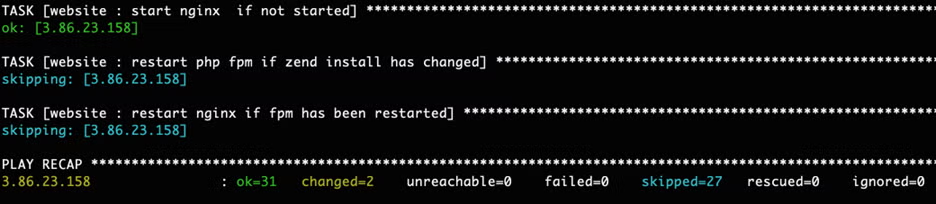
ansible-playbook -i inventory.ini deploy-website.yaml Watch the output: Blue text means a task has been skipped (perfectly normal), green text means the state has already been reached (for example, php is already installed), and yellow text means the task has changed something on the system.
After running this playbook, my process tree looks like this:

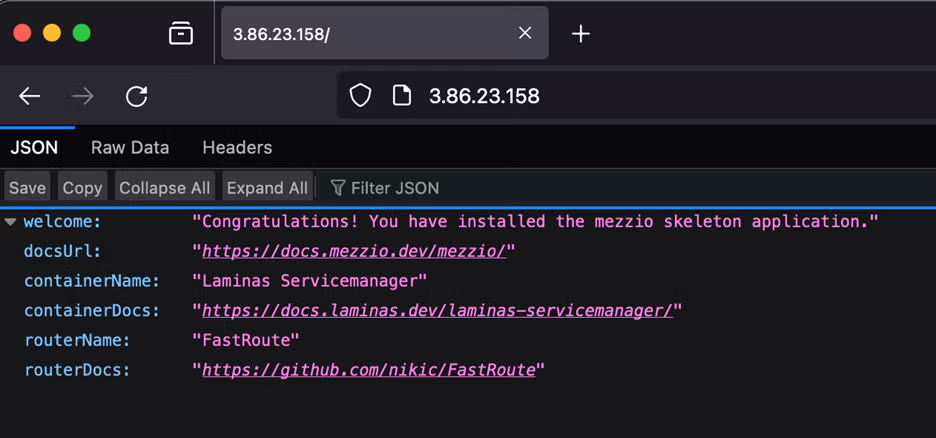
And I can access the app I deployed!
Wrapping Up
Ansible is an excellent tool for managing persistent hosts like bare metal and virtual machines. When learning it for the first time, don’t worry about running a playbook over and over while you are debugging your first roles. Practice makes perfect. Just don’t practice in production!
As noted in our newsletter, we're also working on an ansible playbook for teams using Zend Server that will help teams to migrate faster from Zend Server to ZendPHP. Keep an eye on our blog for more info on that release!
Ready to Deploy Secure PHP at Scale?
ZendPHP makes it easy to deploy and scale fully-patched and supported PHP -- even if it has reached community support end of life. Try for free, to visit our ZendPHP product page to learn more.
Additional Resources
- Blog - How to Migrate Zend Server to ZendPHP
- Blog - Introducing the New Zend Puppet PHP Modules
- Blog - PHP Configuration Management and Why It Matters
- Blog - How to Configure nginx With Drupal 10 and PHP-FPM
- Blog - Zend Server to ZendPHP Deployment With Ansible for IBM i
- On-Demand Webinar - Developing Robust 12-Factor Web Apps
- On-Demand Webinar - PHP Containerization and Orchestration
- On-Demand Webinar - Orchestrating Your PHP Apps With ZendPHP
- Certification - Zend PHP Certified Engineer Exam