Blog
February 26, 2025

ZendPHP runtimes and the ZendHQ extension equip IBM i systems with the necessary tools for developing modern PHP applications. Thanks to a recent database expansion, configuring PostgreSQL and ZendHQ is now possible, providing increased flexibility and data management capabilities while protecting your ZendHQ data against unexpected disasters.
In this blog, I walk through the steps for installing and configuring PostgreSQL as a database alternative for the default ZendHQ local SQLite database on IBM i systems. Following these steps will allow you to take full advantage of ZendHQ Disaster Recovery features while adding flexibility and customization options to your application.
Back to topZendHQ and Relational Databases for Disaster Recovery
ZendPHP runtimes, combined with the powerful ZendHQ extension, deliver reliable performance for PHP applications on IBM i systems. Following a recent database expansion, ZendHQ now offers built-in tools to aid in recovering or transferring ZendHQ data in the event of a disaster, system crash, or other failures.
Previously, ZendHQ relied solely on SQLite, which posed challenges for IBM i teams and PHP developers. However, due to this relational database expansion, ZendHQ now supports MariaDB and PostgreSQL, enabling your team to create reliable backups of critical ZendHQ data. This functionality allows your IBM i environment to designate a primary server along with one or more replicas. In the event the primary server fails, a replica can be promoted to restore ZendHQ data.
To maximize the benefits of these improvements, I will guide you through the steps involved with configuring PostgreSQL and ZendHQ on IBM i systems.
Try Free
Try ZendPHP + ZendHQ Free for 21 Days
This walk through requires access to ZendPHP and ZendHQ. Try both free for 21 days to discover how they fit within your IBM i infrastructure – no commitment required.
How to Configure ZendHQ and PostgreSQL on IBM i: Getting Started
ZendHQ relies on database systems to manage both configuration settings and historical records. This guide will focus on demonstrating the process of installing and configuring PostgreSQL as a substitute for the standard local SQLite database.
For further details about ZendPHP, ZendHQ, or MariaDB, please consult the relevant documentation:
- ZendPHP Installation Documentation
- ZendHQ Installation Documentation
- PostgreSQL Documentation
- The pqsql Cheat Sheet
IBM i - Access Client Solution
IBM i Access Client Solutions (ACS) is an open source package management utility. It is the preferred way to install any open source software on the IBM i server. IBM i ACS is required for the following tutorial, so be sure to follow the installation instructions provided by IBM.
After installing IBM i ACS, or if it is already installed on your server, update to the latest available IBM i ACS base package: IBMiAccess_v1r1.zip. It can be accessed on the IBM website.
IBM recommends using the bash shell for SSH connection. Keep these tips in mind:
- SSH sessions run
bashshell - QP2TERM uses the
shshell - Change the default IBM i shell to
bash
You can then use the SQL client interface, STRSQL or iACSRunSQL:
CALL QSYS2.SET_PASE_SHELL_INFO('*DEFAULT','/QOpenSys/pkgs/bin/bash’)
Next, use the chsh package:
$ /QOpenSys/pkgs/bin/chsh -s /QOpenSys/pkgs/bin/bash
For more information and instructions on troubleshooting use of the bash shell, read the associated documentation.
Install PostgreSQL Using ACS or yum Command
Begin by executing from the command line by using the SSH terminal QP2TErm/MobaXterm/PuTTy:
$   yum list available postgresql*
$   /Qopensys/pkgs/bin/yum install postgresql-server postgresql-contrib
Next, launch the IBM i ACS and select "Open Source Package Management," as pictured here:
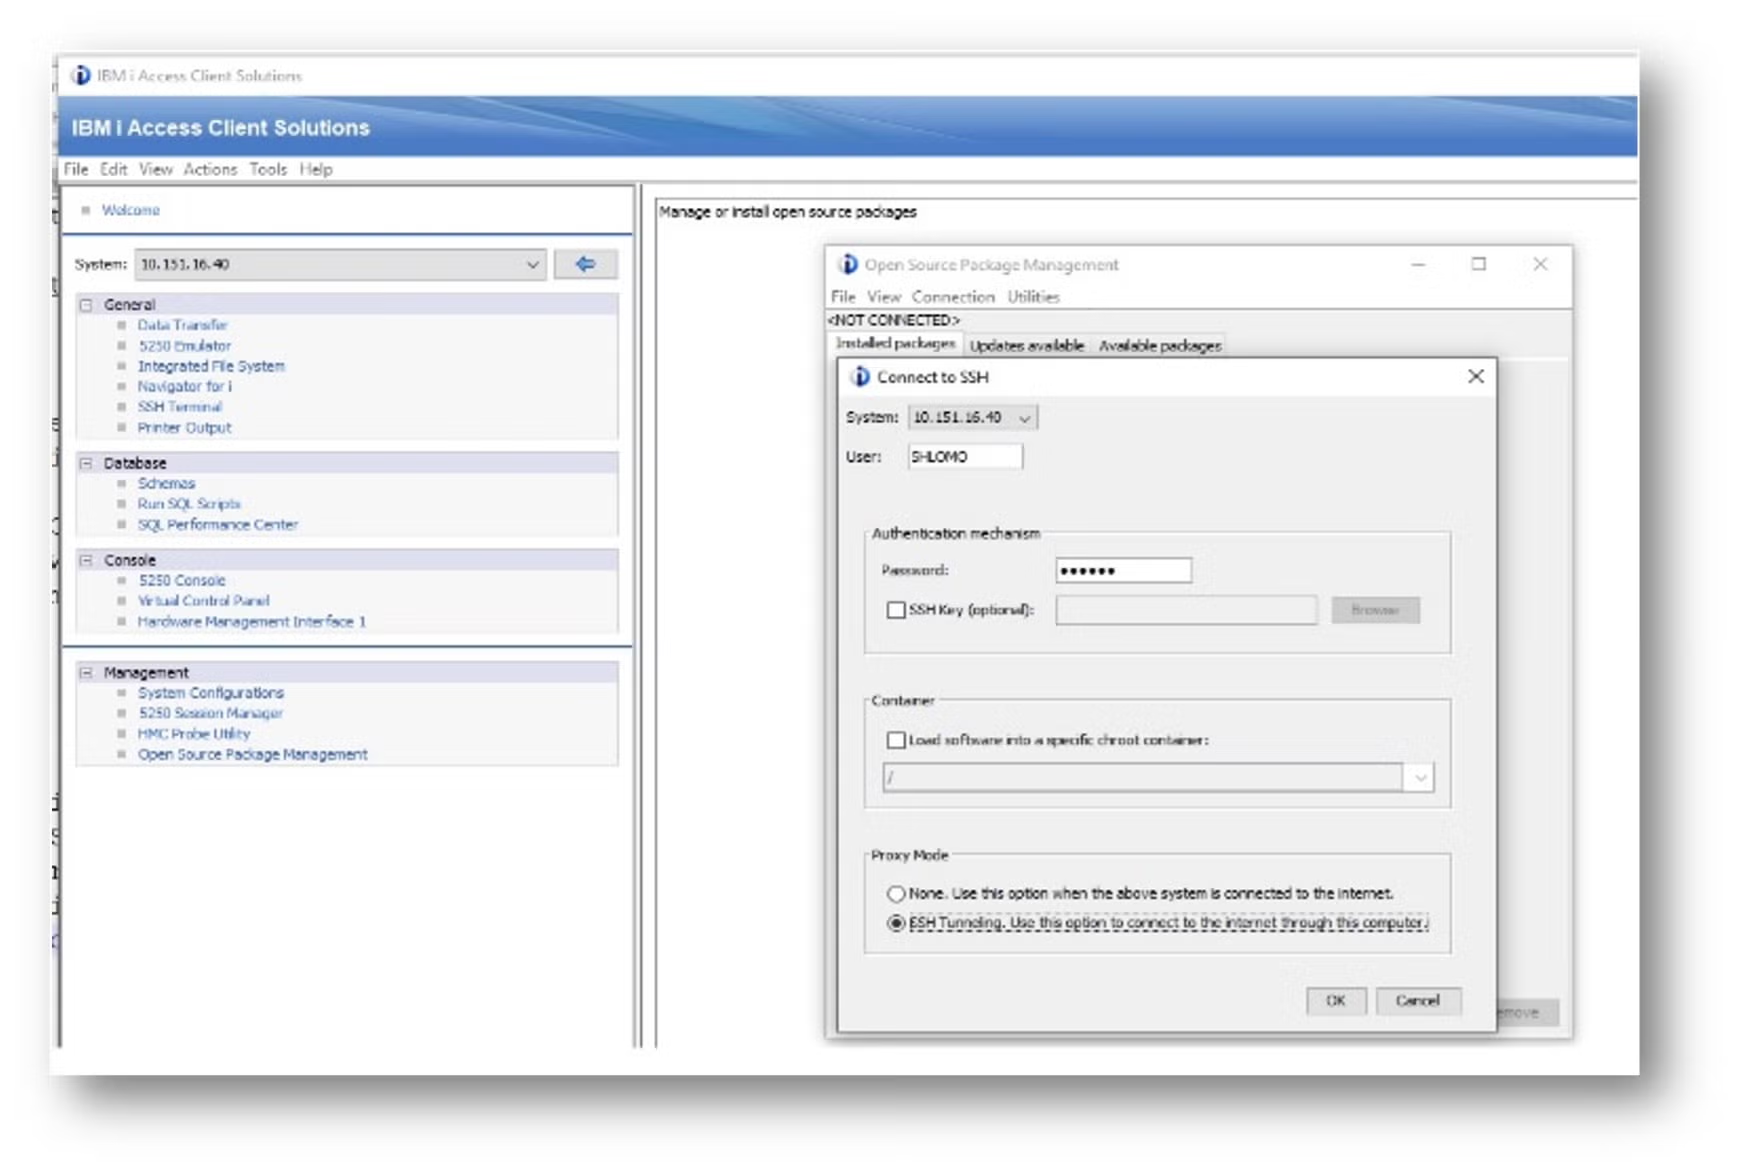
Once the Open Source Package Management utility is available, select the "Available Packages" tab. Next, locate postgresql-server postgresql-contrib and click the "Install" button. Follow the Install screen and wait for the "Completed" message.
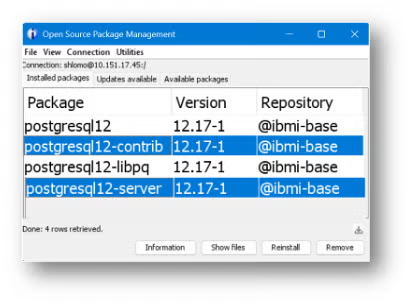
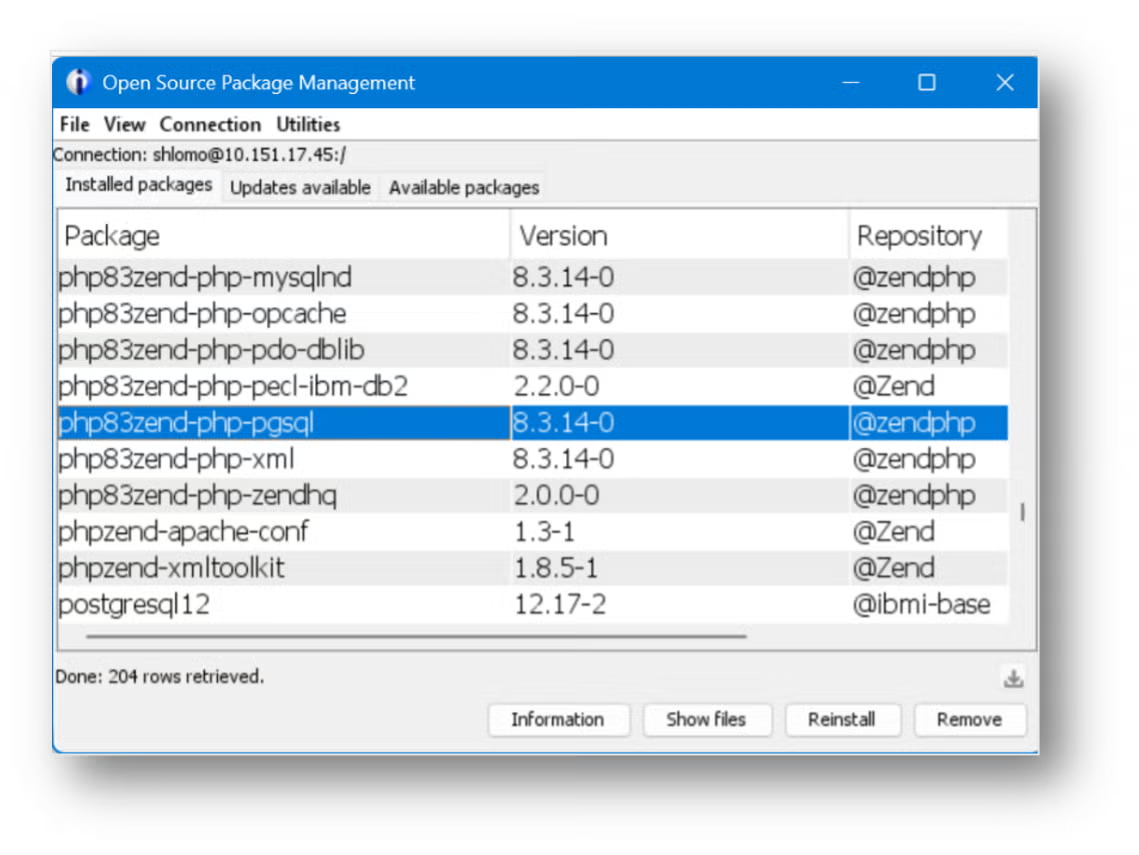
From the Open Source Package Management menu, select the "Installed Packages" tab, then refresh to view the updated list.
 Back to top
Managing and Configuring the PostgreSQL Server
We will now need to configure and establish management of the PostgreSQL server. Follow these step-by-step instructions to ensure all configurations are set to your application's standards.
The PostgreSQL User Account
As the server daemon can be accessible to the outside world, it is advisable to run PostgreSQL under a separate user account. For example, the username POSTGRES is often used.
Use the following if you are starting from an IBM i command line:
$ CRTUSRPRF USRPRF(POSTGRES) PASSWORD() SPCAUT(*JOBCTL)
$ MKDIR DIR('/home/postgres’)
$ CHGOWN OBJ('/home/postgres') NEWOWN(POSTGRES) SUBTREE(*ALL)
If you are beginning from an SSH command line, use this code:
$ system 'CRTUSRPRF USRPRF(POSTGRES) PASSWORD(POSTGRES) SPCAUT(*JOBCTL)'
$ mkdir /home/postgres
$ chown postgres /home/postgres
PostgreSQL System Database: Create and Initialize
When installing for the first time, run the following shell command to initialize the PostgreSQL database in the directory /home/postgres, using QP2Term or any SSH terminal sign-on with the POSTGRES user created:
$ export PGDATA=/home/postgres
$ /qopensys/pkgs/bin/initdb -E UTF-8 -D /home/postgres -W -A scram-sha-256
You will be prompted to enter a database superuser password for the Postgres user. Please note that this password is for the database, and it is distinct from the POSTGRES user created previously.
If installed successfully, you will see the following message: "Success. You can now start the database server using: pg_ctl -D /home/postgres -l logfile start."
PostgreSQL Remote Access
By default, PostgreSQL is configured to listen for clients from localhost (127.0.0.1), and as such only native IBM i users and apps can access the PostgreSQL server. However, you can allow PostgreSQL local users and remote-management software users access to the PostgreSQL server by using the following steps.
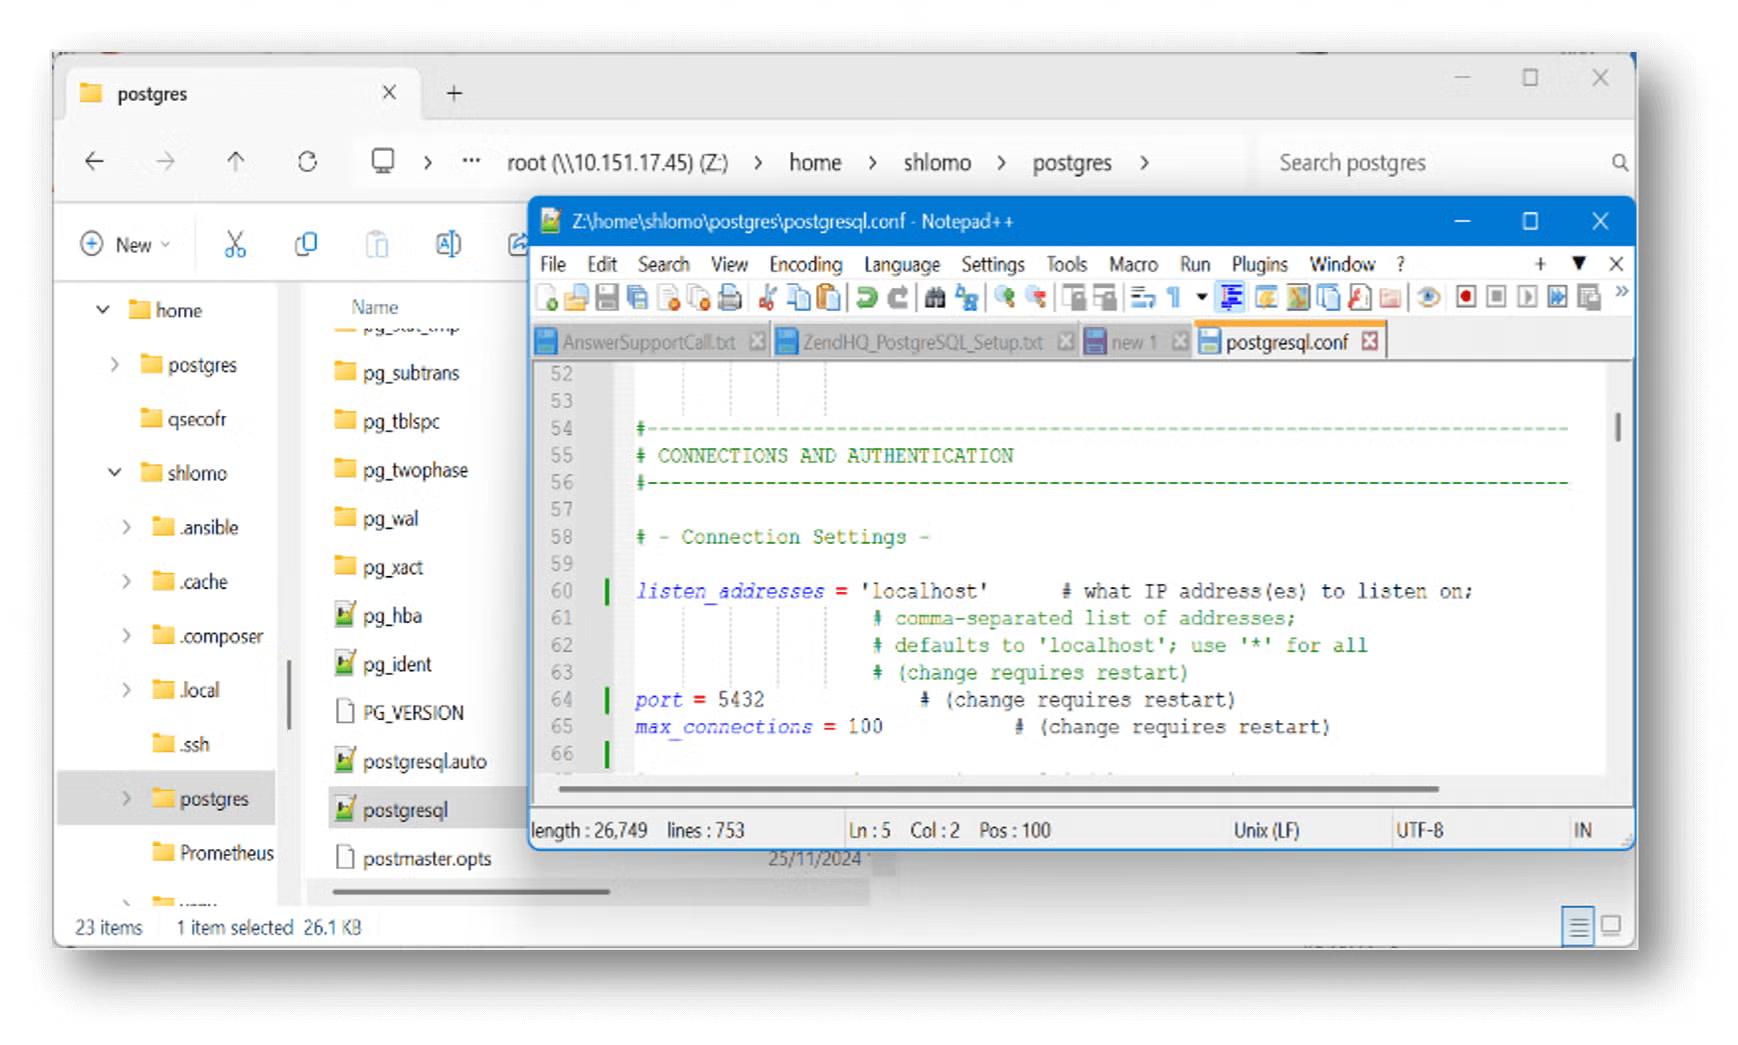
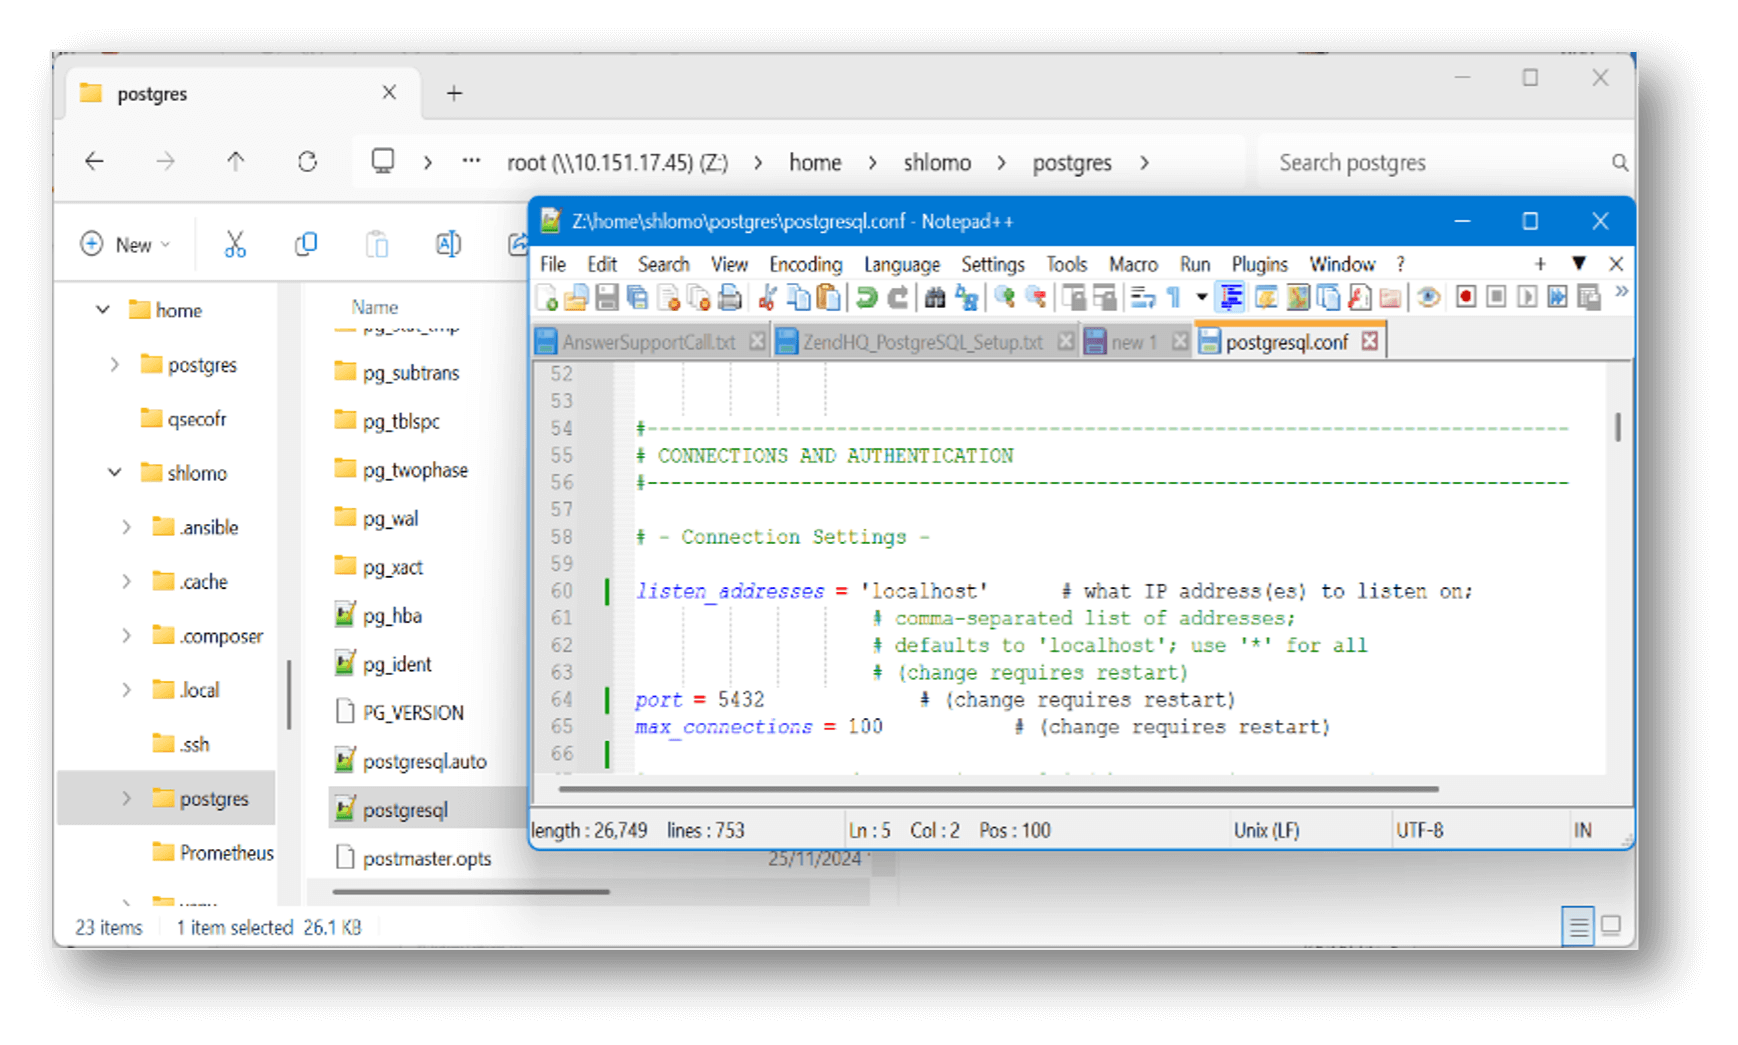
First, set the PostgreSQL server to listen to a particular IP address or all IP addresses. You can then modify the PostgreSQL server configuration file created in the directory /home/postgres/postgresql.conf. Change the listen_addresses directive use any text editor, such as EDTF on IBM i, vim/nano on Linux, or NotePad on Windows. For example:
$ WRKLNK ‘//home/postgres/postgresql.conf’   - option 2 to use EDTF
$ EDTF '/home/postgres/postgresql.conf’
# CONNECTIONS AND AUTHENTICATION
# listen_addresses = 'localhost’
    listen_addresses = '*'
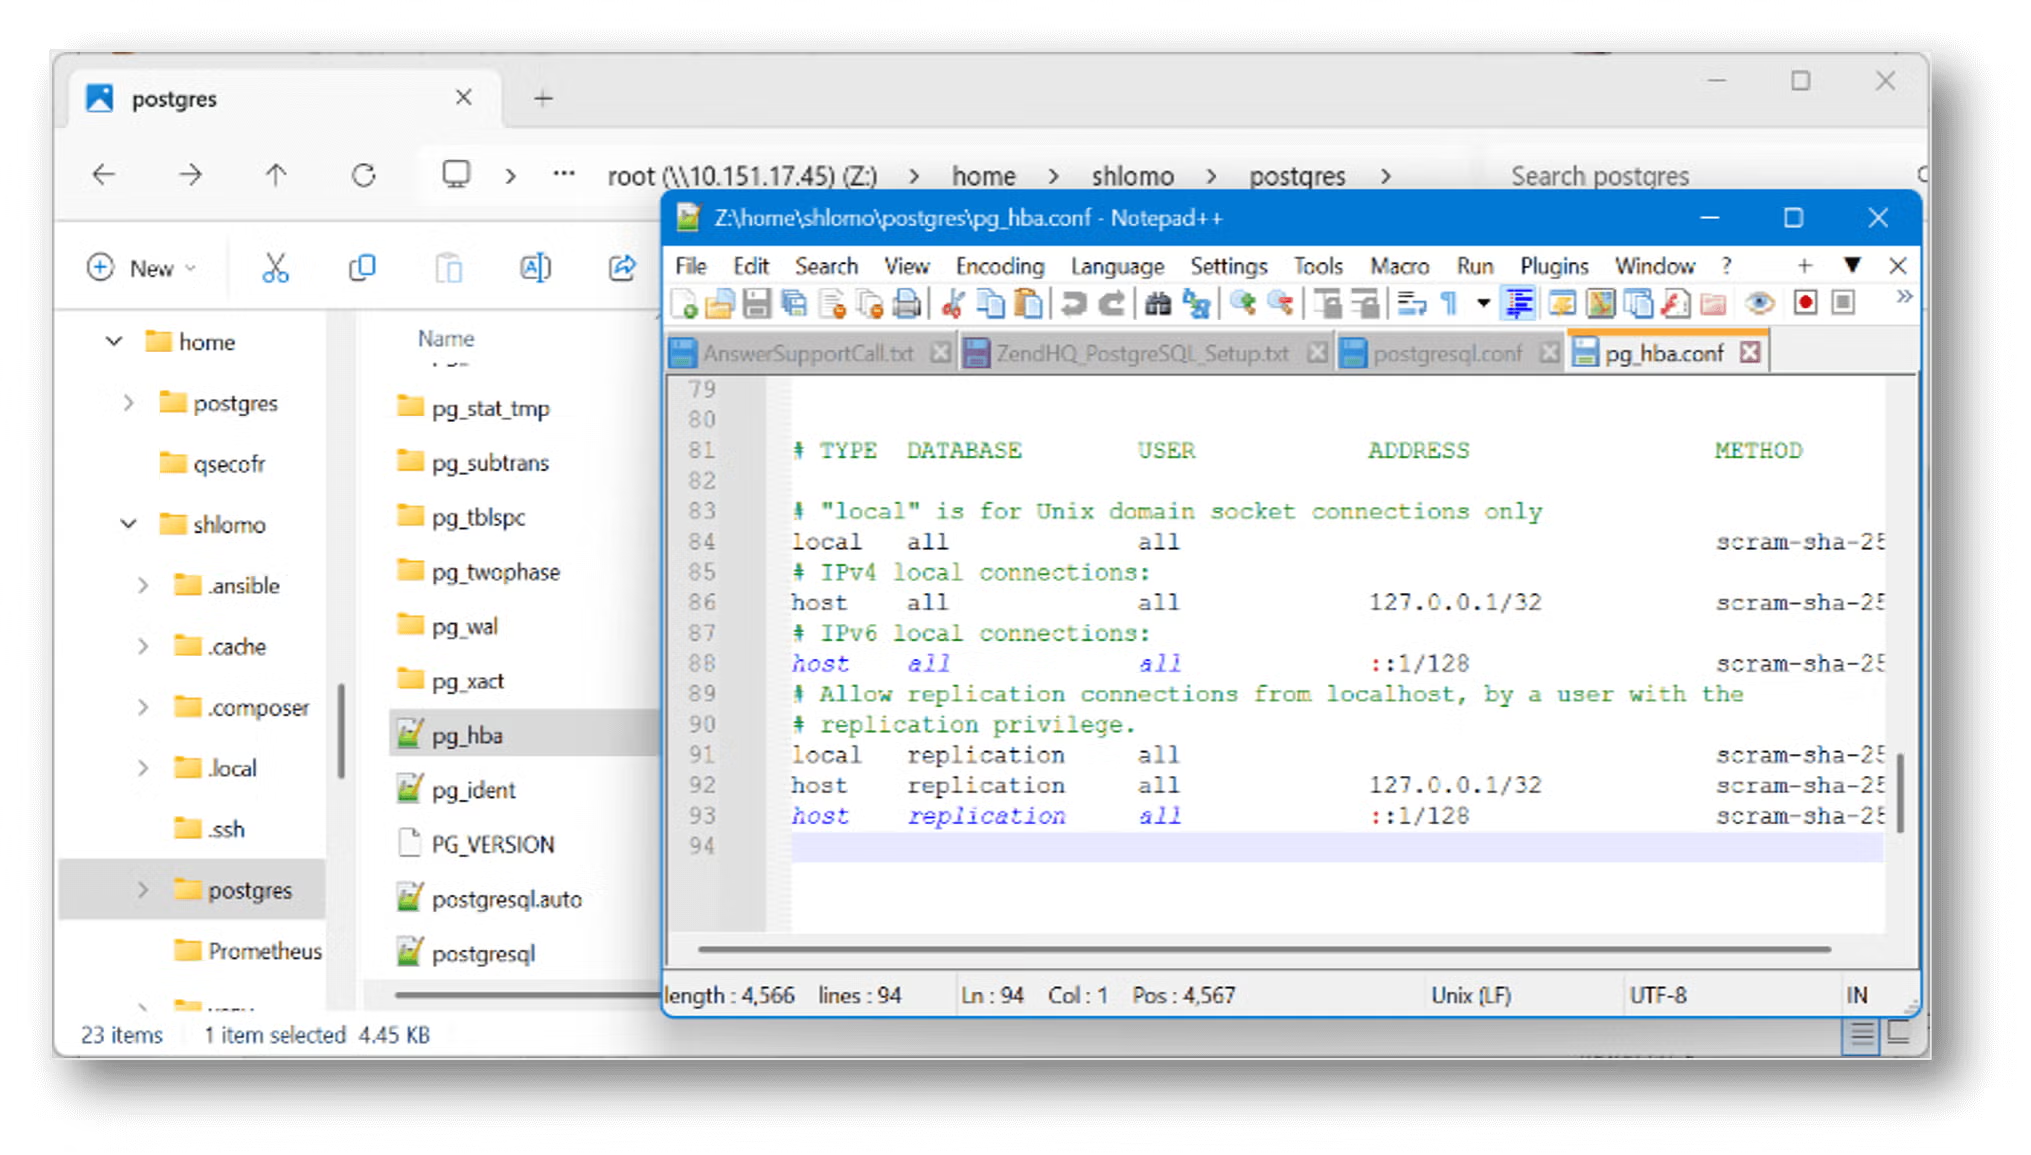
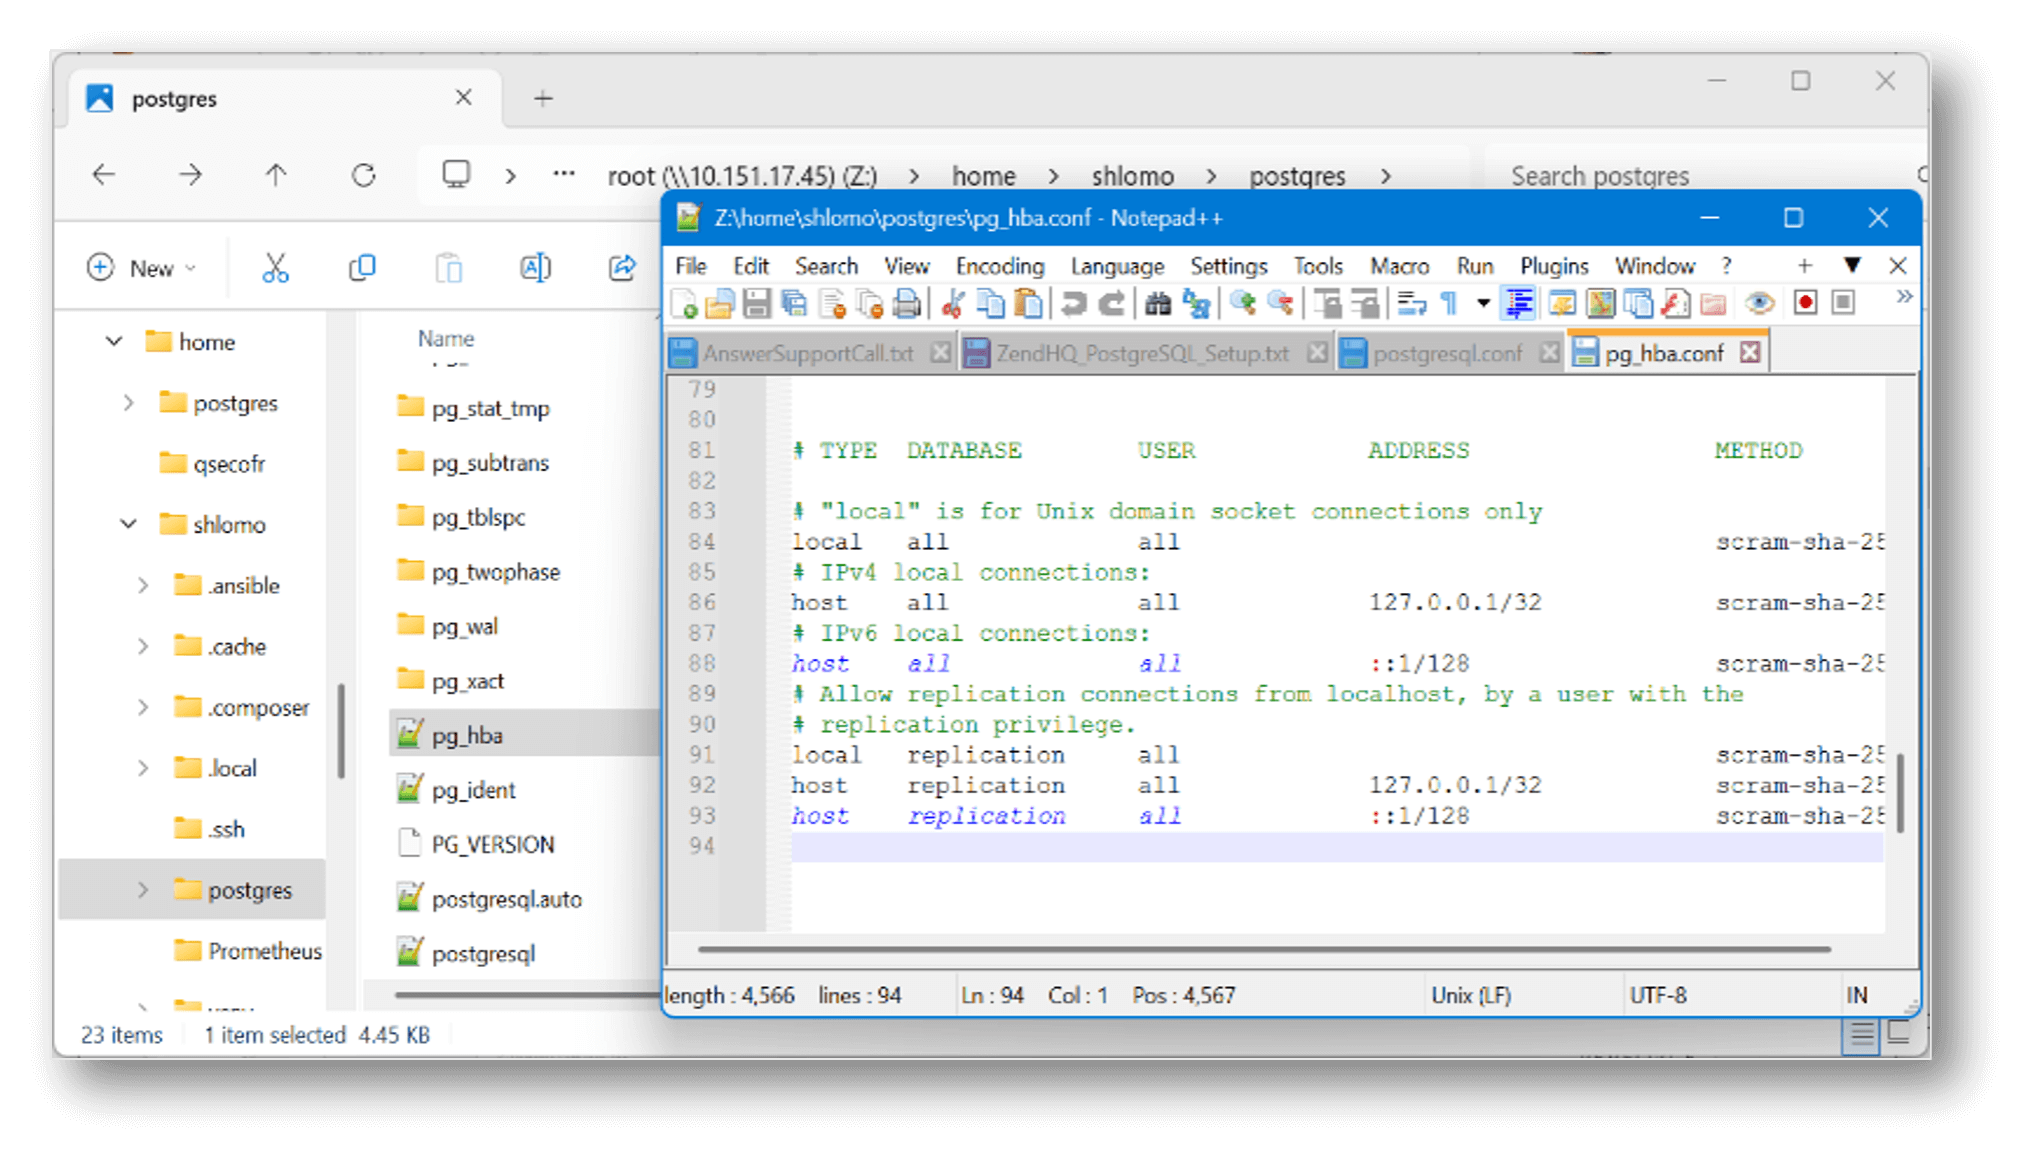
Now, you can modify the PostgreSQL host-based authentication (HBA) configuration file created in the directory /home/postgres/pg_hba.conf. Add remote address access to the IPv4 local connections using your preferred text editor:
$ WRKLNK ‘//home/postgres/pg_hba.conf’   - option 2 to use EDTF
$ EDTF '/home/postgres/pg_hba.conf’

# IPv4 local connections:
# TYPE  DATABASE  USER   ADDRESS             METHOD
  host    all     all   127.0.0.1/32        scram-sha-256
  host    all     all    0.0.0.0/0          scram-sha-256
PostgreSQL Server Control Utility
pg_ctl is a utility for initializing a PostgreSQL database, such as starting, stopping, or restarting the PostgreSQL database server, or displaying the status of a running server:
$ /qopensys/pkgs/bin/pg_ctl –help
Start the PostgreSQL Server Daemon
If not set in your path or in your home/postgres/.profile, change the directory. Please note that you can create the .profile file after the PostgreSQL server install, but not before.
$ cd /qopensys/pkgs/bin
$ /qopensys/pkgs/bin/pg_ctl -D /home/postgres -l logfile start
You should see the following messages:
- Waiting for server to start...Done
- Server started
Alternatively, use an IBM i command line or CL Program to call a bash script:
$ PGM(QP2SHELL) PARM('/home/postgres/PostgreSQL_manages.bash' 'S’)
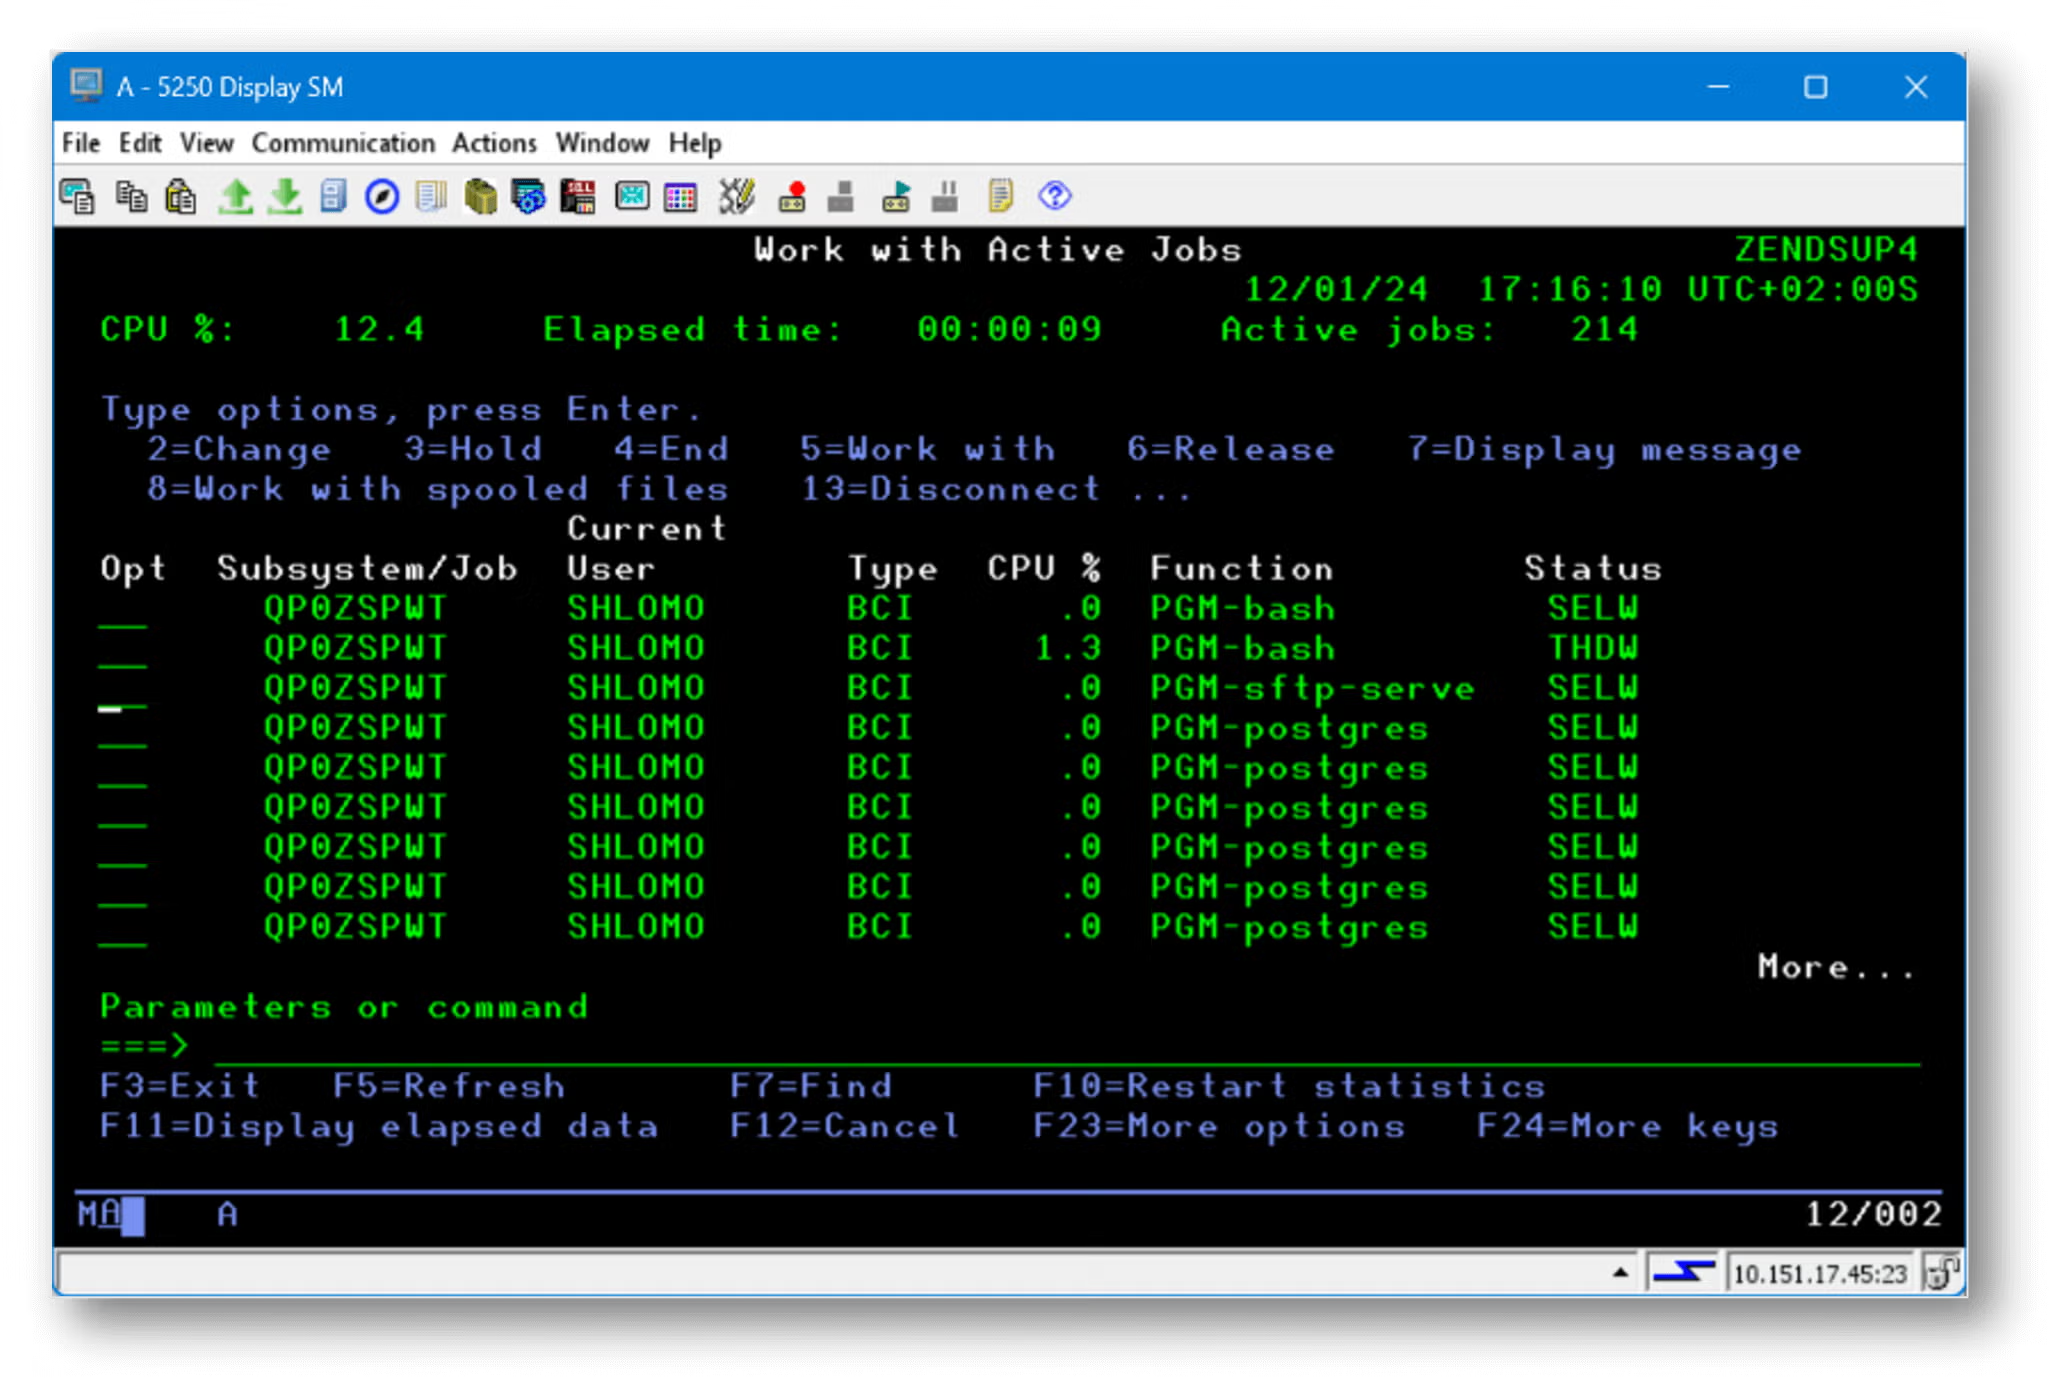
Show PostgreSQL Active Processes
Get the list of all running PostgreSQL processes by using the ps utility or WRKACTJOB:
$ ps ax | grep postgresql  or  ps -ef | grep postgresql
    2328001 - /QOpenSys/pkgs/lib/postgresql12/bin/postgres -D /home/postgres
$ WRKACTJOB SBS(QUSRWRK)
     QP0ZSPWP     POSTGRES   BCI      .0  PGM-postgres     SELW
     QP0ZSPWP     POSTGRES   BCI      .0  PGM-postgres     SELW
If the process started from a CLP or a 5250 session, use SBS based on JOBD:
$ WRKACTJOB SBS(QBATCH)
Verify the server is listening on port 5432:
$ NETSTAT OPTION(*CNN)
Stop the PostgreSQL Server Daemon
If using an SSH terminal command line, implement:
$ /qopensys/pkgs/bin/pg_ctl -D /home/postgres -l logfile stop
If using an IBM i command line or CL program, implement:
$ PGM(QP2SHELL) PARM('/home/postgres/PostgreSQL_manages.bash' ‘E’)
Here is an example bash script (PostgreSQL_manages.bash):
#!/QOpenSys/pkgs/bin/bash
set –e
if [ $1 = "S" ]; then
    #If they are equal then print this
    /qopensys/pkgs/bin/pg_ctl -D /home/postgres -l logfile start
                  echo "PostgreSQL Start Services " $(ps -e | grep -c postgres*)
elif [ $1 = "E" ]; then
    /qopensys/pkgs/bin/pg_ctl -D /home/postgres -l logfile stop
                   echo "PostgreSQL Shutdown Services“
fi
The PostgreSQL configuration and log files directory location should be as follows:
$ WRKLNK    OBJ('/ home/postgres/*.conf*') DETAIL(*EXTENDED) DSPOPT(*ALL)
$ WRKLNK    OBJ('/home/postgres/logfile*') DETAIL(*EXTENDED) DSPOPT(*ALL)
Test PostgreSQL Using ZendPHP
Next, install the ZendPHP pgsql extension to test the PostgreSQL database server:
<?php
// Connecting, selecting database
$dbconn = pg_connect("host=localhost dbname=postgres user= postgres password= postgres ")
or die('Could not connect: ' . pg_last_error());
echo "connection successful";
// Closing connection
pg_close($dbconn);
?>
Back to top
Implementing ZendHQ Using PostgreSQL Database
Use the following steps to implement ZendHQ using the PostgreSQL database. For more information on configuring ZendHQ with alternative databases, please refer to the full ZendHQ database configuration documentation.
Connect Client to the Server
The psql command line client is a frontend to interact with the PostgreSQL server. Use psql to connect to the server, run SQL statements to create databases and tables, insert or update or delete or view data, and log in to PostgreSQL command line.
Alternatively, you can use a GUI client like pgAdmin, DBeaver, or others to connect to the Postgres server instead of psql.
psql Command Tool Command Types
The psql command tool has two different kinds of commands. First, there are commands that are preceded with a backslash and are for psql control, appearing as the following:
\c dbname   \connect dbname  Connect to database
\l  or \list                     List available databases
\dt                                 List available tables
\d or \d+ dbname   List of relations (Column/Type attribute)
\du                                List of roles
\q                                   quit
The second kind of command is using valid SQL commands to create and modify PostgreSQL databases:
CREATE / INSERT / SELECT / DROP / UPDATE etc.
Create the PostgreSQL ZendHQ Database and User
Now, you will need to create the ZendHQ Postgres database. The ZendHQ daemon will create the tables. Begin by logging in to the PostgreSQL command line:
$ /qopensys/pkgs/bin/psql
You will then be prompted to enter the password. Once you login, create a new database named "zendhq" or any name selected:
postgres=# CREATE DATABASE zendhq;
Next, create a new user named "zendhq" or any name selected:
postgres=# CREATE ROLE zendhq WITH SUPERUSER LOGIN PASSWORD 'zendhq';
Configure PostgreSQL as a Database for ZendHQ Instead of SQLite
Change the /opt/zend/zendphp/etc/zendhqd.ini and comment the include directive for SQLite.
# The default SQLite database engine
;include = zendhqd_sqlite.ini
Uncomment the include directive for PostgreSQL:
# PostgreSQL database engine
include = zendhqd_psql.ini
Change the /opt/zend/zendphp/etc/zendhqd_pgsql.ini host, port, user, and password:
# Type of the database engine (DO NOT CHANGE!)
zendhqd.database.type = pgsql
# Database host # Default: localhost
zendhqd.database.hostname = localhost
# Database port
zendhqd.database.port = 5432
# Database user name # Default: (empty)
zendhqd.database.username = zendhq
# Database password # Default: (empty)
zendhqd.database.password = zendhq
# The name of the database to use Default: zendhq
zendhqd.database.dbname = zendhq
To apply these changes, restart the ZendHQ daemon. You can then use the psql command line to confirm the files created, and login to PostgreSQL, where you will be prompted to enter the password:
$ /qopensys/pkgs/bin/psql
Once you login, select to work with the "zendhq" database:
postgres=#  \l                                 List Databases
postgres=#  \c zendhq               Connect to database
postgres=#  \dt                              List tables
postgres=#  select id, value from conf_values;
Test and Migrate ZendHQ Databases Using the zendhqctl Database Commands
In this post, we will examine two commands for testing and migrating ZendHQ databases using zendhqctl database commands. For a full list of commands, please visit the zendhqctl database module documentation.
To test the current database configuration, use this command:
zendhqctl database test [-t|--table-prefix prefix]
To migrate data to the new database, use this command:
zendhqctl database migrate [-y|--yes] [-k|--keep-migration-file] FROM [TO]Final Thoughts
The ZendHQ database expansion provides reliable and customizable database solutions for IBM i systems. By configuring PostgreSQL with ZendHQ, your IBM i PHP application can take advantage of ZendHQ data recovery in the event of a disaster or data loss.
Free Demo
Advanced Observability Tooling for PHP Applications
ZendHQ makes it easy to monitor, inspect, optimize, automate, secure, and scale mission-critical PHP IBM i applications. Learn more about how it can improve your observability processes.
Additional Resources
- IBM i Blog
- Blog - How to Connect PHP and PostgreSQL
- Blog - Configuring ZendHQ and MariaDB for IBM i
- Blog - Zend Server to ZendPHP Deployment
- Blog - How to Automate ZendHQ JobQueue Timezone Shifts of IBM i
- Resource Collection - Guide to PHP and IBM i