Blog
November 14, 2022

In this blog, we walk through the steps for setting up a ZendPHP, PHP-FPM, and Nginx web server on IBM i, including configuration and fastcgi files.
Back to topZendPHP Installation and Configuration
This walkthrough detailed in this blog requires you to have ZendPHP already installed on your IBM i server.
To start, use the Zend script for managing the install/uninstall processes:
wget https://downloads.zend.com/zendphp/ibmi/zendphp_manage.shYou will also need to add the executable portion to the owner of the file, while ignoring the umask:
chmod ug+x zendphp_manage.shAfter that, make sure you have installed all prerequisite tools:
yum install wget tar-gnu gzip db2utilThe zendPHP_manage.sh script creates the ZendPHP yum repository file /QOpenSys/etc/yum/repos.d/zendphp.repo .
You can use this script to install the requested ZendPHP version using:
./zendphp_manage.sh --version=<PHP version>Note: If you need full details on how to use the managing script, use the command:
zendphp_manage.sh --help
The ZendPHPH executable binary installed directory will be /QOpenSys/pkgs/bin
yum list installed | grep zendYou can see the ZendPHP error log file in directory /QOpenSys/var/log .
cat > /qopenSys/var/log/php_errors.logYou will want to change the php.ini file directive to Log php errors to the specified file. To do so, open the file at /qopensys/etc/php/81zend/php.ini, then change the directive:
error_log = "/QOpenSys/var/log/php_errors.log”You can view documentation for the ZendPHP installation process here.
Back to topPHP-FPM Installation and Configuration
PHP-FPM is a simple and robust FastCGI Process Manager for PHP. Additional extensions, like PHP-FPM, are installed separately from your initial ZendPHP install.
Before you jump into installation, it's important to remember that the ZendPHP naming format prfix contains the PHP for the version specific released package. For example, packages compatible with PHP version 8.1 have the prefix: "php81zend-php".
To install the php-fpm extension for PHP version 8.1, either install it using the Access Client Solution Manager, or use the script:
yum install -y php81zend-php-fpmAfter that, you will want to set up your path and .profile to include php-fpm. To do that, use the echo command with a redirect to update the .profile file:
echo "PATH=/QOpenSys/pkgs/bin:/QOpenSys/pkgs/sbin:\$PATH\nexport PATH" > $HOME/.profileThen use the cat command to display the contents of your .profile file:
cat $HOME/.profileNext, we'll move to the configuration file global directives:
/QOpenSys/etc/php/81zend/php-fpm.confThere, you'll define global options
- pid = run/php-fpm.pid
- error_log = log/php-fpm.log
- log_level = notice
- include=/QOpenSys/etc/php/81zend/php-fpm.d/*.conf
Note that php-fpm.pid and php-fpm.sock files are located in directory /QOpenSys/var/run
ps -ef | grep fpm
ls -l /QOpenSys/var/run/
Next, you'll move onto the PHP-FPM configuration file for pool directives:
/QOpenSys/etc/php/81zend/php-fpm.d/www.confOnce there, you will define the pool options:
- user = qtmhhttp
- group = nogroup
- listen = /QOpenSys/var/run/php-fpm.sock
- pm.max_children = 5
- pm.start_servers = 2
- Other directives
When you do this, note that multiple pool processes may be started with different management options on different ports, and the pool name will be used for the logs and stats files.
To start PHP-FPM, run the command php-fpm:
/QOpenSys/pkgs/sbin/php-fpmTo stop PHP-FPM, run the command:
ps -ef | grep php-fpm| awk '{print $2}'| xargs kill -9Lastly, to test the PHP-FPM configuration, run the command:
/QOpenSys/pkgs/sbin/php-fpm –tIf the test is succesfull, you'll see a notice similar to the one below:
[26-Oct-2021 17:00:03] NOTICE: configuration file /QOpenSys/etc/php/81zend/php-fpm.conf test is successful
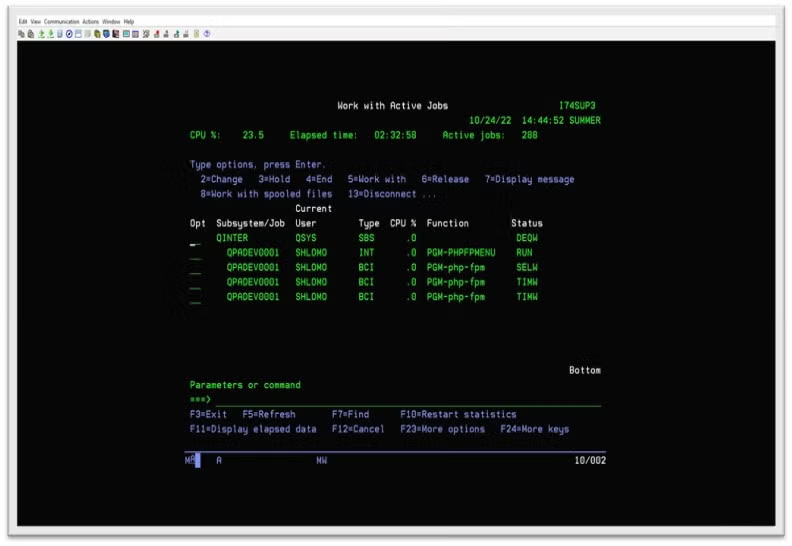
Note that starting the PHP-FPM from a 5250 session, CLP or QP2term will run the jobs under the QINTER subsystem.
 Back to top
Nginx Installation Via Access Client Solution
Nginx is a web server that can be used as a reverse proxy, load balancer, mail proxy, and HTTP cache. You can read more about Nginx in the documentation.
Nginx Server is available via the IBM i Yum-based Access Client Solutions Open Source Package Management.
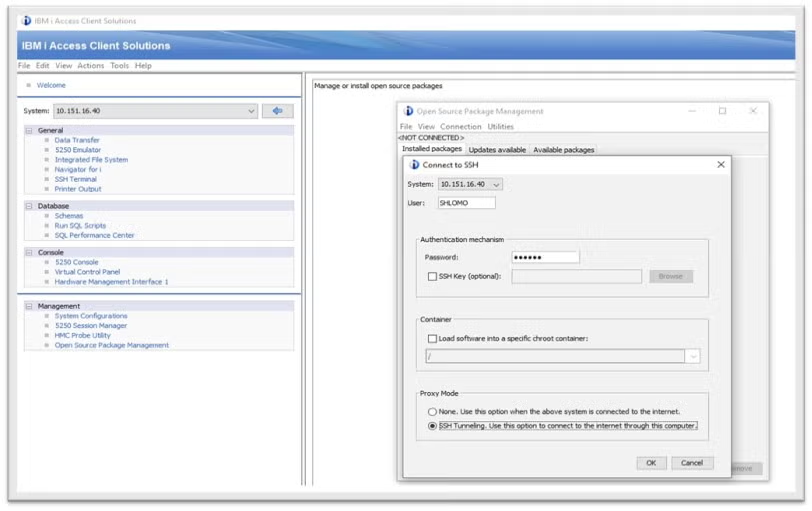
To get started installing Nginx, first launch the IBM i Access Client Solution by selecting "Open Source Package Management." Once the Open Source Package Management utility is available, select the "Available Packages" tab, then scroll to locate the "Nginx" sever option.
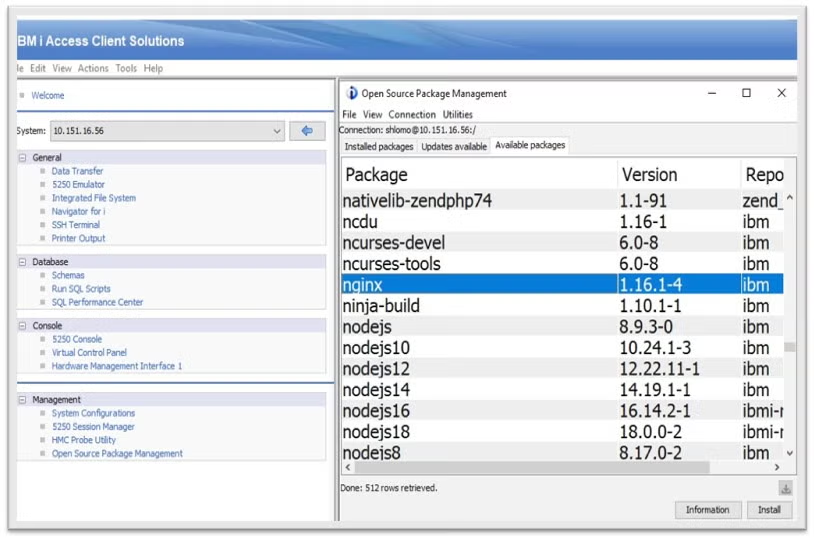
Once there, click the install button, then follow the install screen until you see the "completed!" message.
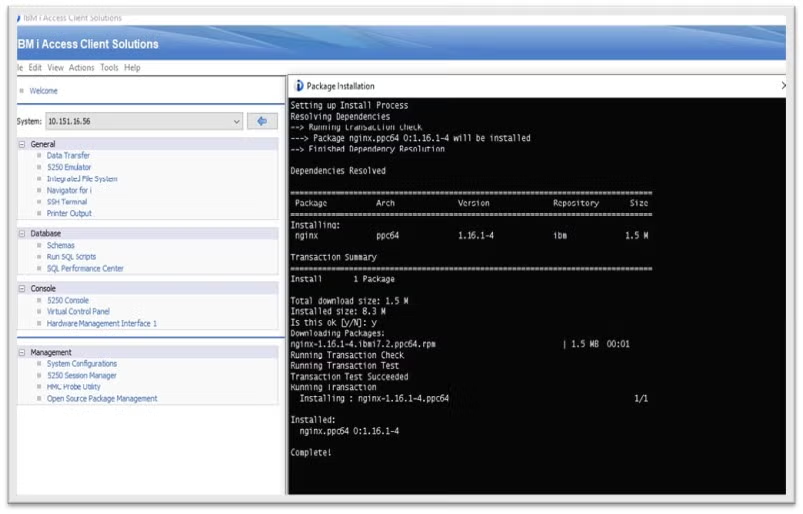
After that's completed, head back to the Open Source Package Management menu and select the "Installed packages" tab, then select View | Refresh to refresh the list of installed packages.
Back to topNginx Installation Via SSH Terminal
Nginx installation can be done using any of the available SSH command interface/shells. Though, note that Qp2term uses ksh shell, while external SSH terminals like MobaXterm, PuTTy, and others use bash.
To execute from the command line, use SSH terminal QP2Term/MobaXterm/PuTTy, then use the following commands:
yum list availableyum install nginx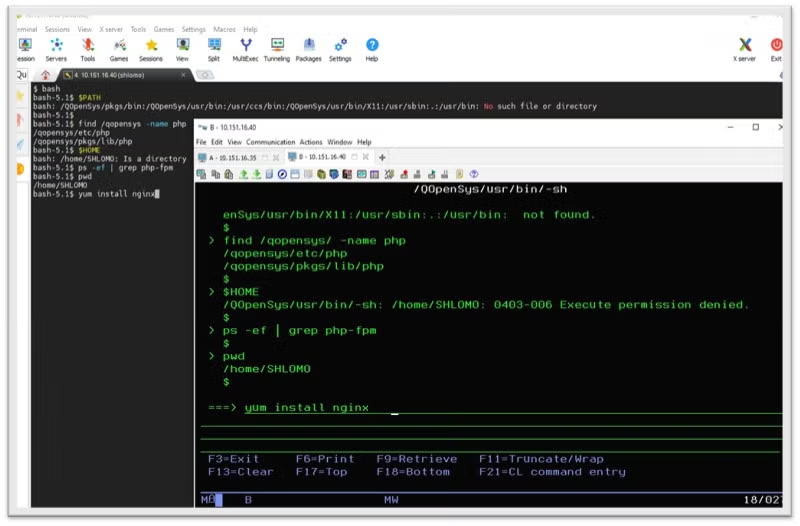
You can find the full Nginx installation instructions on the IBM support pages here.
Back to topConfiguring Nginx
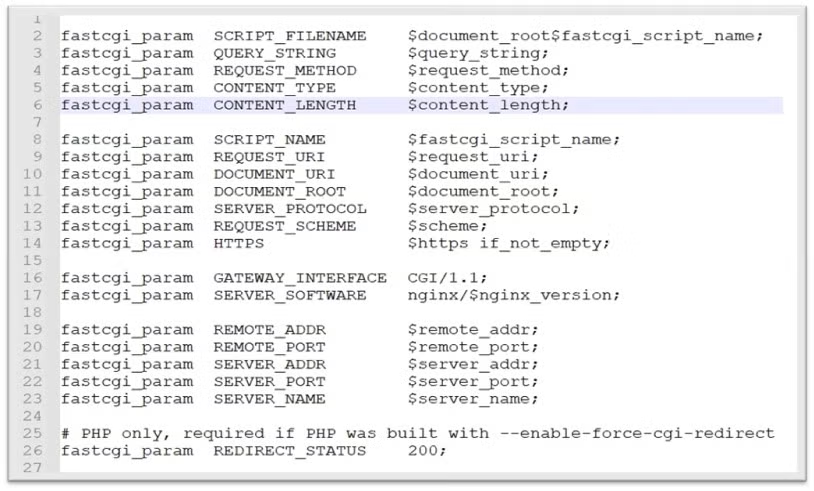
The Nginx default configuration files can be found at:
/QOpenSys/etc/nginx/nginx.conf/QOpenSys/etc/nginx/fastcgi.confTo edit them, open using your preferred text editor (e.g. EDTF on IBM i, vim on Linux, NotePad on Windows)
For the Nginx Server configuration file /QOpenSys/etc/nginx/nginx.conf, set the following directives:
- ‘worker_processes’ define a number processes
- ‘pid’ process id of the master process
- ‘worker_connections’ max number of simultaneous connections
- ‘listen’ port number
- ‘server-name’ IP address
- ‘root’ PHP application directory -> /www/zendphp/htdocs
- ‘fastcgi_pass’ directive, to a unix-domain socket path -> unix:/QQopenSys/var/run/php-pfm.sock;
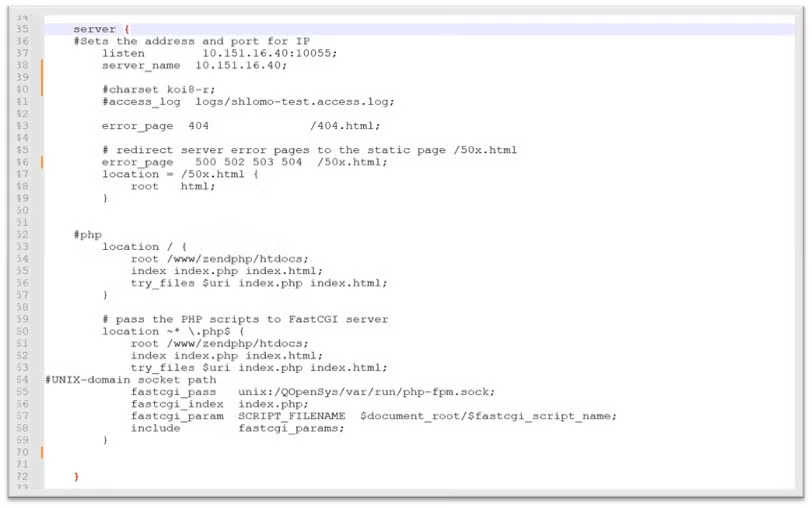
The Nginx fastCGI configuration file uses the default directives used in this blog.
Note that you need to manually create the Nginx logs folder. Attempting to start the Nginx executable file will send the following error:
nginx: [emerg] open() "/QOpenSys/etc/nginx/logs/nginx.pid" failed (2: No such file or directory)
To resolve this issue, create the directory:
mkdir /QOpenSys/etc/nginx/logsControlling Your Nginx Server
To start the Nginx server, run the executable file nginx from any SSH terminal command line or CLP:
/QOpenSys/pkgs/bin/nginxThen, to control the Nginx server, run the executable file nginx with the -s parameter and a signal using the syntax:
nginx -s signalHere are some useful commands:
- stop - fast shutdown
- quit - graceful shutdown
- reload - reload the configuration file
- reopen - reopening the log files
As an example, for a fast shutdown you would use:
/QOpenSys/pkgs/bin/nginx –s stop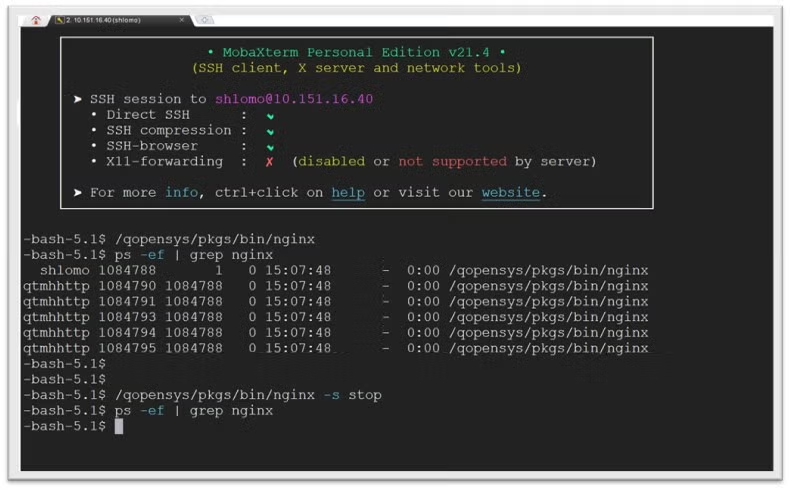
The Nginx worker processes(jobs) will use QTMHHTTP user profile. To get the list of all running Nginx processes, you can use the ps utility or WKRACTJOB:
ps -ef | grep nginx
     shlomo     711881      1   0 18:57:27      -  0:00 nginx
     qtmhhttp 711882 711881   0 18:57:27      -  0:00 nginx
WRKACTJOB SBS(QUSRWRK)
QP0ZSPWT SHLOMO BCI .0 PGM-nginx THDW
QP0ZSPWT QTMHHTTP BCI .0 PGM-nginx SELWNote that starting Nginx from a SSH terminal like MobaXterm/PuTTY will run the jobs under QUSRWRK subsystem.
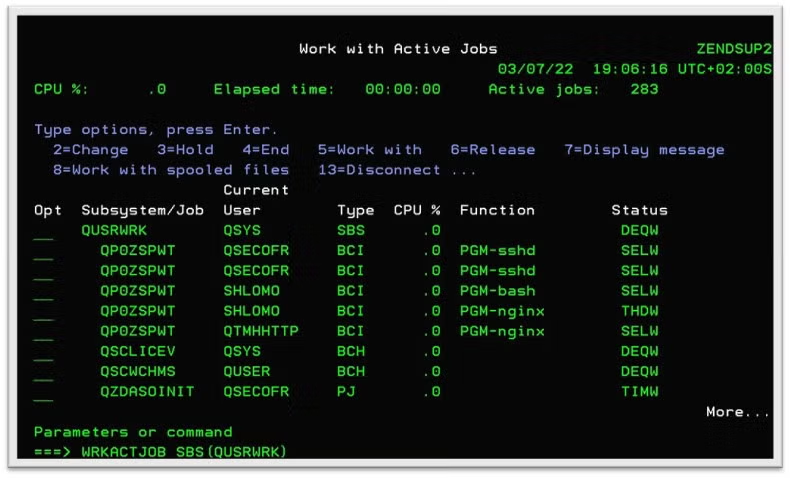
Or, if you're starting Nginx from a 5250 session, CLP or QP2term will run the jobs under the QINTER subsystem.

Here is the IBM i Menu using a CL Program and a bash scripting combination:
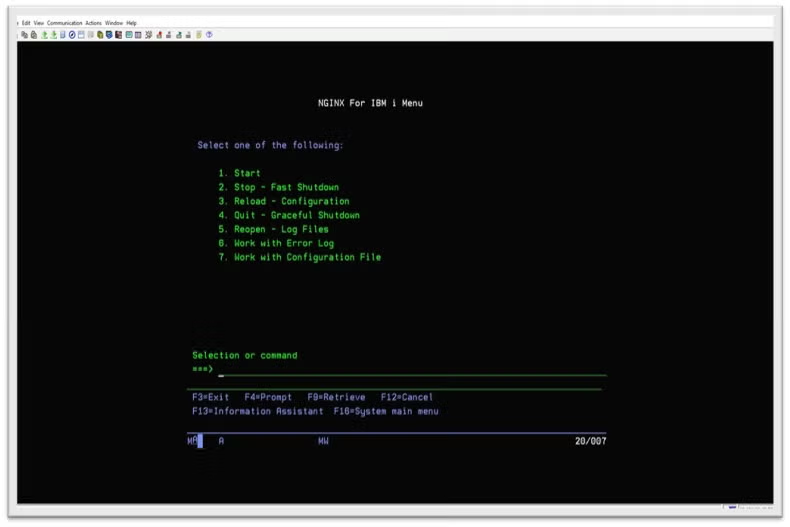
 CLP
 QSYS/PGM PARM(&ACTION)
  DCL        VAR(&ACTION) TYPE(*CHAR) LEN(6)
  /* START NGINX jobs */
  IF         COND(%SST(&ACTION 1 1) *EQ 'S') THEN(DO)
  CALL       PGM(QP2SHELL)  PARM('/home/shlomo/nginxmanage.bash' 'S')
  MONMSG     MSGID(CPF0000)
  WRKACTJOB SBS(QINTER)
  SNDPGMMSG MSG('NGINX Start Services ')
  ENDDO

Bash
#!/QOpenSys/pkgs/bin/bash
set -e
if [ $1 = "S" ]; then
 /qopensys/pkgs/bin/nginx
echo "NGINX Start Services " $(ps -e | grep -c nginx)
fiThe Nginx Welcome Page
The default Nginx Welcome Page directory is:
/qopensys/etc/nginx/html/index.html Running with the above blog settings should load the Welcome Page from the root directory defined in nginx.conf:
/www/zendphp/htdocs
http://10.151.16.40:10055/index.html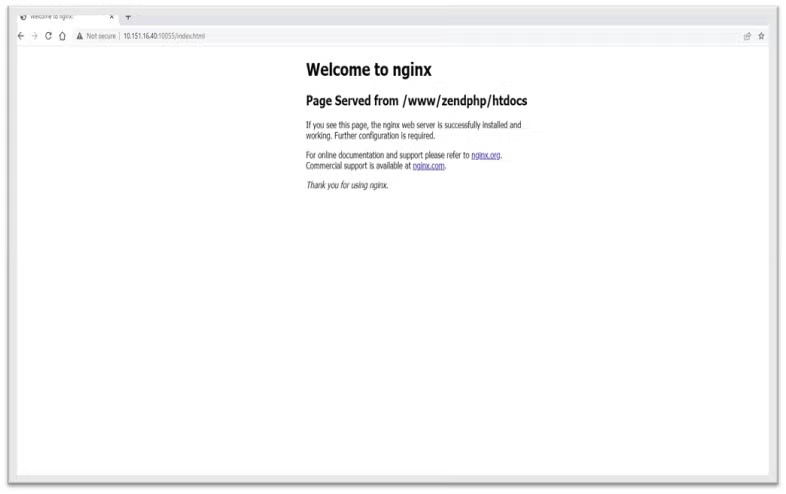 Back to top
Wrapping Up
That's really all there is to it. Keep in mind that he example we outlined here is a very basic configuration and you will want to configure to fit the needs of your system. But, aside from that, getting running with ZendPHP, Nginx, and IBM i is a fairly easy process.
Need Help Modernizing Your IBM i?
Contact us today to learn more about how we can help modernize your IBM i applications.
Additional Resources
- White Paper - IBM i Modernization
- Case Study - AgVantage Software Modernizes Front-End System With ZendPHP on IBM i
- Blog - Exploring ZendHQ for IBM i
- Blog - Comparing ODBC vs. Db2 for IBM i
- Blog - Using Mezzio on IBM i
- Blog - Using MariaDB and PHP on IBM i
- Blog - IBM i Merlin and What it Means for PHP Teams
- Blog - Installing Zend Server on IBM i
- Blog - Installing ZendPHP on IBM i
- Blog - IBM i 7.5 for PHP: Exploring Db2 Services
- Blog - How to Configure nginx for Drupal 10 and PHP-FPM