Blog
April 29, 2022

Zend Server and Zend PHP updates are available for IBM i and strongly recommended. The installation process on the latest versions has changed significantly – and might surprise you.
Fret not, however, as we have some information here to help get you across that finish line and have the latest and greatest PHP stack in the industry.
This article is NOT designed to replace the installation documentation on our site, but rather to enhance it.
Zend Server EOL Is Coming
Zend Server 2019 reached EOL in July, 2025. Zend Server 2021 will reach EOL in December, 2027. The time to make your migration plan is now. Luckily, migrating to ZendPHP has never been easier. Use the resources below to explore your options.
Back to top
Getting Started With Zend Server on IBM i
In previous releases, Zend Server was installed as a licensed program on IBM i. Now, with Zend Server 2020 and Zend Server 2021, we are installing via the RPM and Yum Open Source options distributed by IBM.
Back to topOpen Source Package Management
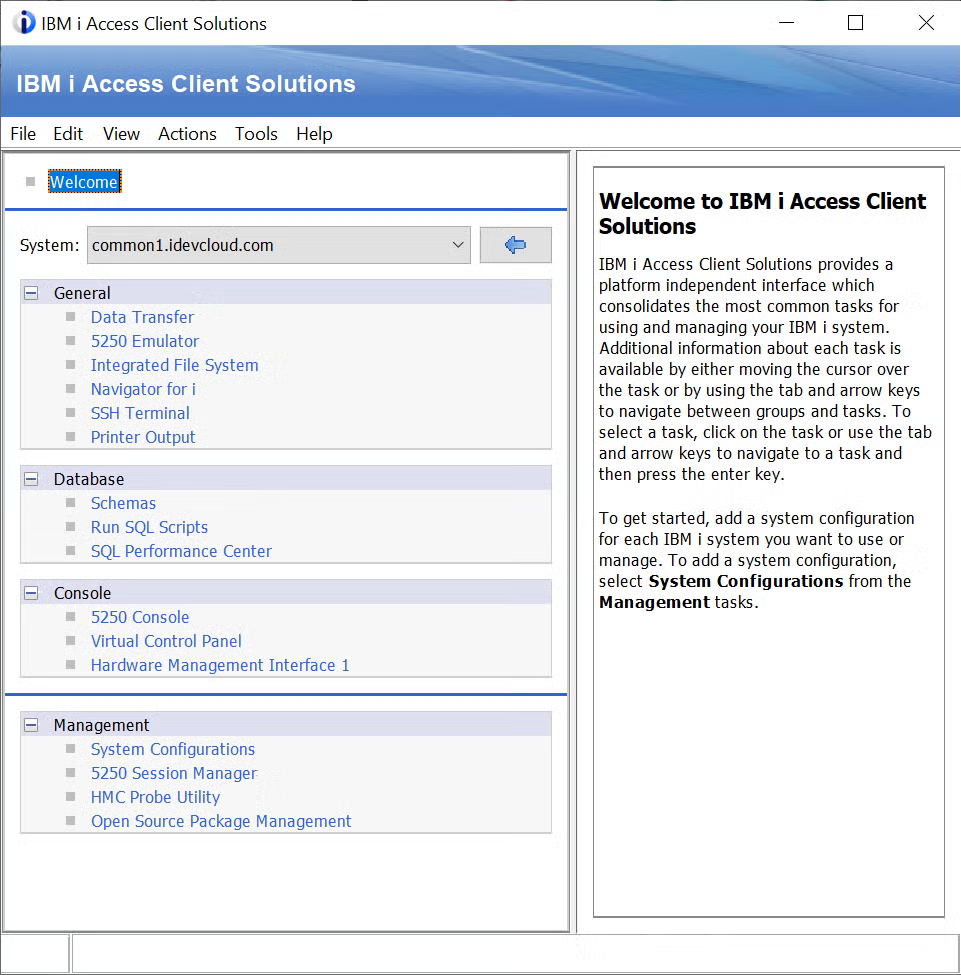
Are you using these tools? How would you know? The quickest way to find out is to look at ACS and click the link on the main page for Open Source Package Management, found here. The image shown below is from version 1.1.9.0 of ACS, so the option might still be behind the “Tools” menu on the top if you are on an older version. We won’t get into the weeds of getting the RPM Pile on IBM i as IBM has done a wonderful job of describing that.
Instead of downloading a large LP and using the RSTLICPGM command, the new process requires a simple command and the product installs directly to the IBM i. We’ve created a series of Zend Server installation videos that can help. In this article I’ll give some color commentary on the key points. All the details for installation can be found on the Zend site here.
Does Your IBM i Have Access to the Internet?
The first major difference in installing Zend Server is the requirement for the partition to be able to reach out to the Internet. The old process required downloading a very large Save File and then uploading it to the IBM i. The new process actually saves a step as we install directly to the server in one step!
For the sake of brevity, let’s assume it can see resources on the internet. We’ll address installing to an offline partition in another article.
Prerequisites
As the installation instructions indicate, our pre-requisites have not changed much. Still the same 5 LP’s and arguably more important is the latest group PTF for HTTP.
Since we rely heavily on Apache for Zend Server and ZendPHP, being VERY current on your Apache server is always a good idea, regardless of whether your webs site is public-facing or internal. At this stage of the game, I would be shocked if your partition did not have these already installed. Occasionally some folks must build out a new partition, maybe for dev or on a cloud host that is minimally configured. These LP’s will get you to where you need to go
I use an SSH client, but some folks still love the green screen. The examples seen in the online documentation are a green screen and my examples are from an SSH client called PuTTY. Either will work, but if you are going to be doing more with open source, it’s a good idea to start using a REAL SSH client rather than the green screen.
Do You Have a Home Directory Setup?
Check the user profile for the credential you are using to install Zend Server. A user profile with *SECOFR authority is required to complete the installation.
The HOMEDIR attribute of the user profile should be set, most often with a value like “/home/USERID”. This will be an internal scratch space for the process to execute.
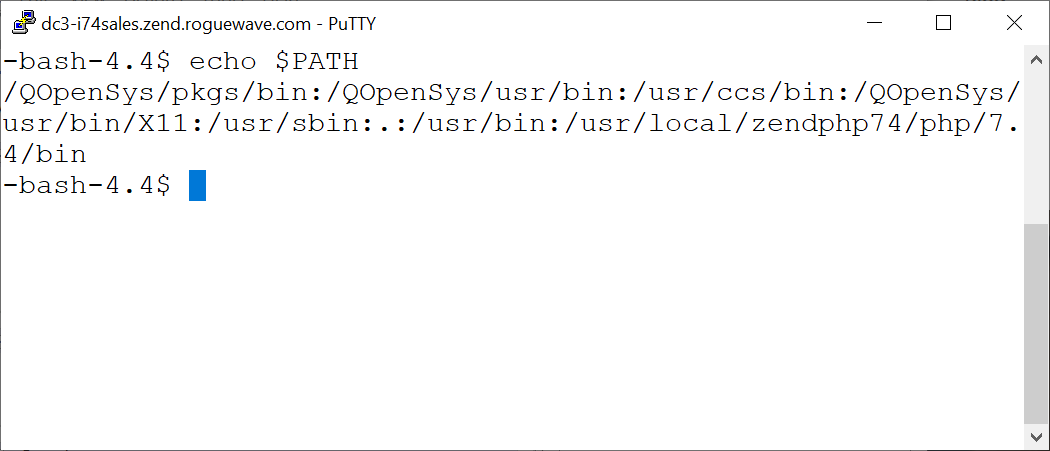
The commands for the installation will work if they can be found. Check to see if /QOPenSys/pkgs/bin is the first path in your path list by typing echo $PATH as illustrated below. If the path is not set, please refer to our installation instruction for details on how to set that up by created a hidden file called .profile.
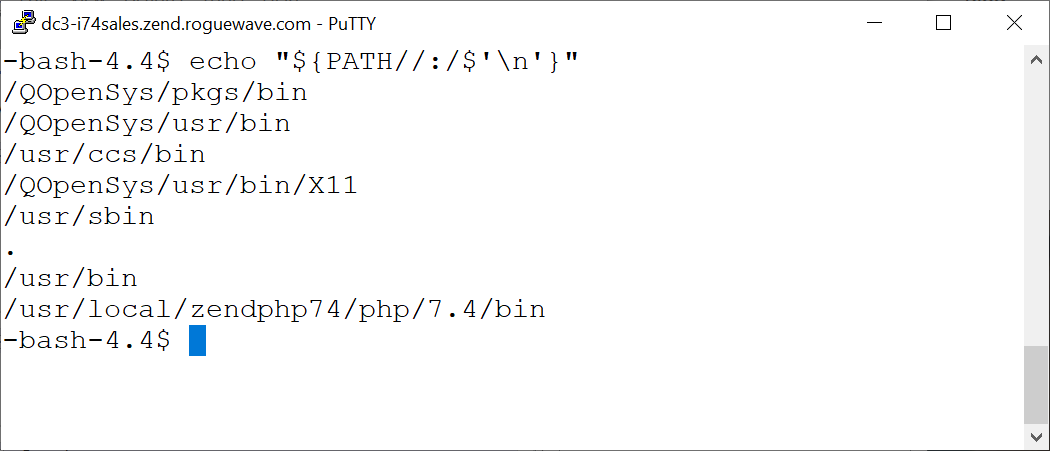
To make the paths easier to read, and if you are using Bash, try a slightly more elaborate Bash command like echo "${PATH//:/$'\n'}".
If you are not familiar with Bash, check out Andy Youens's channel on YouTube where an IBM i guy talks about Bash!
You can verify the path by issuing the yum version command. If path is correct, the output should look something like this.

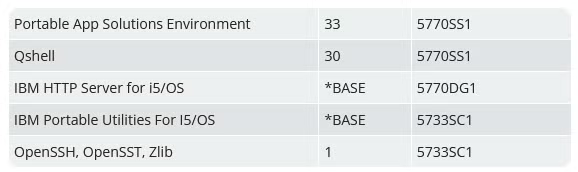
One more bit of prep is necessary, and this only needs to happen once per partition. Four utilities are required to begin the installation. The command to install these is quite simple using yum install wget tar-gnu gzip db2util. But if you prefer, you can also use the GUI screen in IBM’s Open Source Package management. Check to see if these utilities are installed and, if not, head to the “Available Packages” tab, select them, and then click install. On my partition, they are already there.
 Back to top
Starting Your Zend Server IBM i Installation
Now the big moment – let’s install Zend Server!
For this step, I HIGHLY recommend using the command in the Zend server Installation documentation. Copy and paste it into the command line like this:

There is a LOT to unpack here, so let’s look at a few things:
- wget is a utility that will reach out to public repositories and pull down the installer program. This command is doing most of the heavy lifting with regard to transporting the files to your local partition. The URL immediately following the wget command contains the fully qualified domain and pathname of the installer.
- Notice this file that is downloaded has a suffix of tar.gz. this is a common *nix method creating an archive (tar is much like a .zip or Save File) and compression (gzip makes it smaller).
- The commands to reverse the suffix must be run in reverse order. In this case, the gzip will run tan the the untar.
- The pipe symbol is kind of a break in the command that essentially feeds the first step to the tar command to extract the installer file.
- -xzf are case sensitive tar switches that will ask tar to:
- x = extract
- z = unizip the file (uncompress)
- f = use the file specified here
- The -C tells the extraction to take place in the directory indicated. In this case /tmp.
- -xzf are case sensitive tar switches that will ask tar to:
- Finally, the command asks to run the extracted script via the && command automatically.
These commands may run a few minutes. Once complete, the hashtag or Bash prompt should reappear. From this point you are ready to “bootstrap” Zend Server by going to your web server and launching the process, usually located at port 10101.
Back to topQuestions? Speak With Our PHP Experts
As always, any questions installing Zend Server or ZendPHP should be directed to the Zend Support team at the contact set up for your account.
Other IBM i Resources
While you're here, you may be interested in this related content on IBM i:
- On-Demand Webinar: Choosing the Right PHP for Your IBM i
- Resource: Developer's Guide to PHP and Open Source on IBM i
- Training: IBM i Training Exercises
- Blog - IBM i Modernization: Modernizing Smartly and on a Budget
- Blog - Using ZendPHP, PHP-FPM, and Nginx on IBM i
- Blog - IBM i MERLIN and What it Means for PHP Teams
- Blog - Using HTTP Proxy Support for IBM i
- Blog - Using MariaDB and PHP on IBM i
- Blog - Using Mezzio on IBM i